
DIY Natural Wood Alcove Shelving
Continuing on with my “dog days of summer slump”, I have yet to muster up the strength or energy for another major home improvement project since completing my Modern Farmhouse dining room makeover.
Simply put… I have been utterly useless the past few weeks- indulging my inner hedonist with lazy weekends full of wine, ice cream and Netflix. One major benefit of finally reaching my thirties, however, is that I now know myself enough to just embrace this rut, because I have finally accepted that there is really no way to force creativity.
As one of my favorite sayings goes, “this too shall pass”, and I think I am entitled to a little down time every so often.
Luckily, I have some unpublished tutorials from past DIY projects up my sleeves, so I am not totally empty handed. In fact, today I finally get the chance to share a somewhat “forgotten” project today with these DIY wooden alcove shelves that we built for my son’s room back in April.
To appreciate the aesthetically pleasing organization accomplished by these wooden shelves, you have got to see what an absolute hell hole my son’s room was before…..
Before:
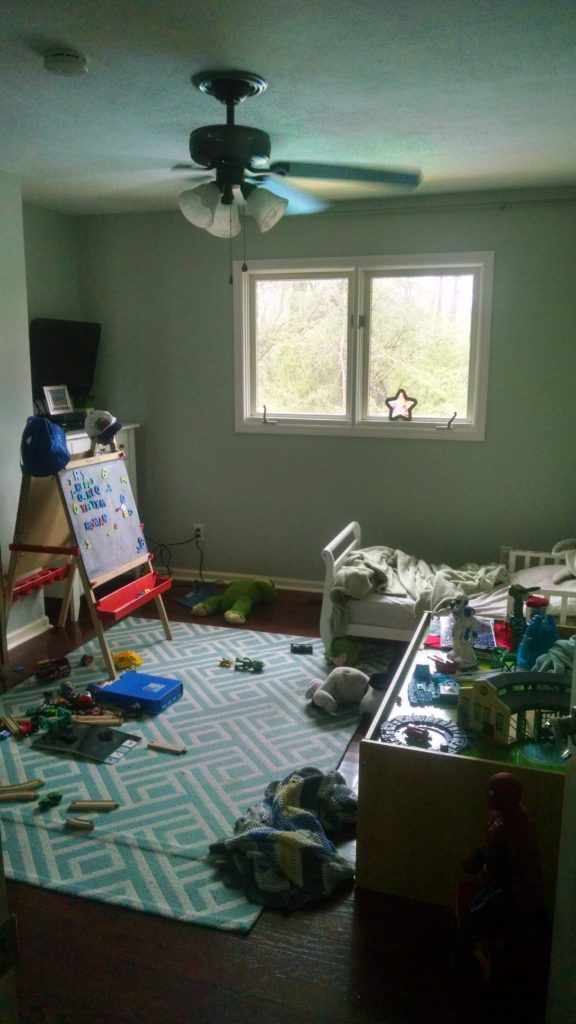
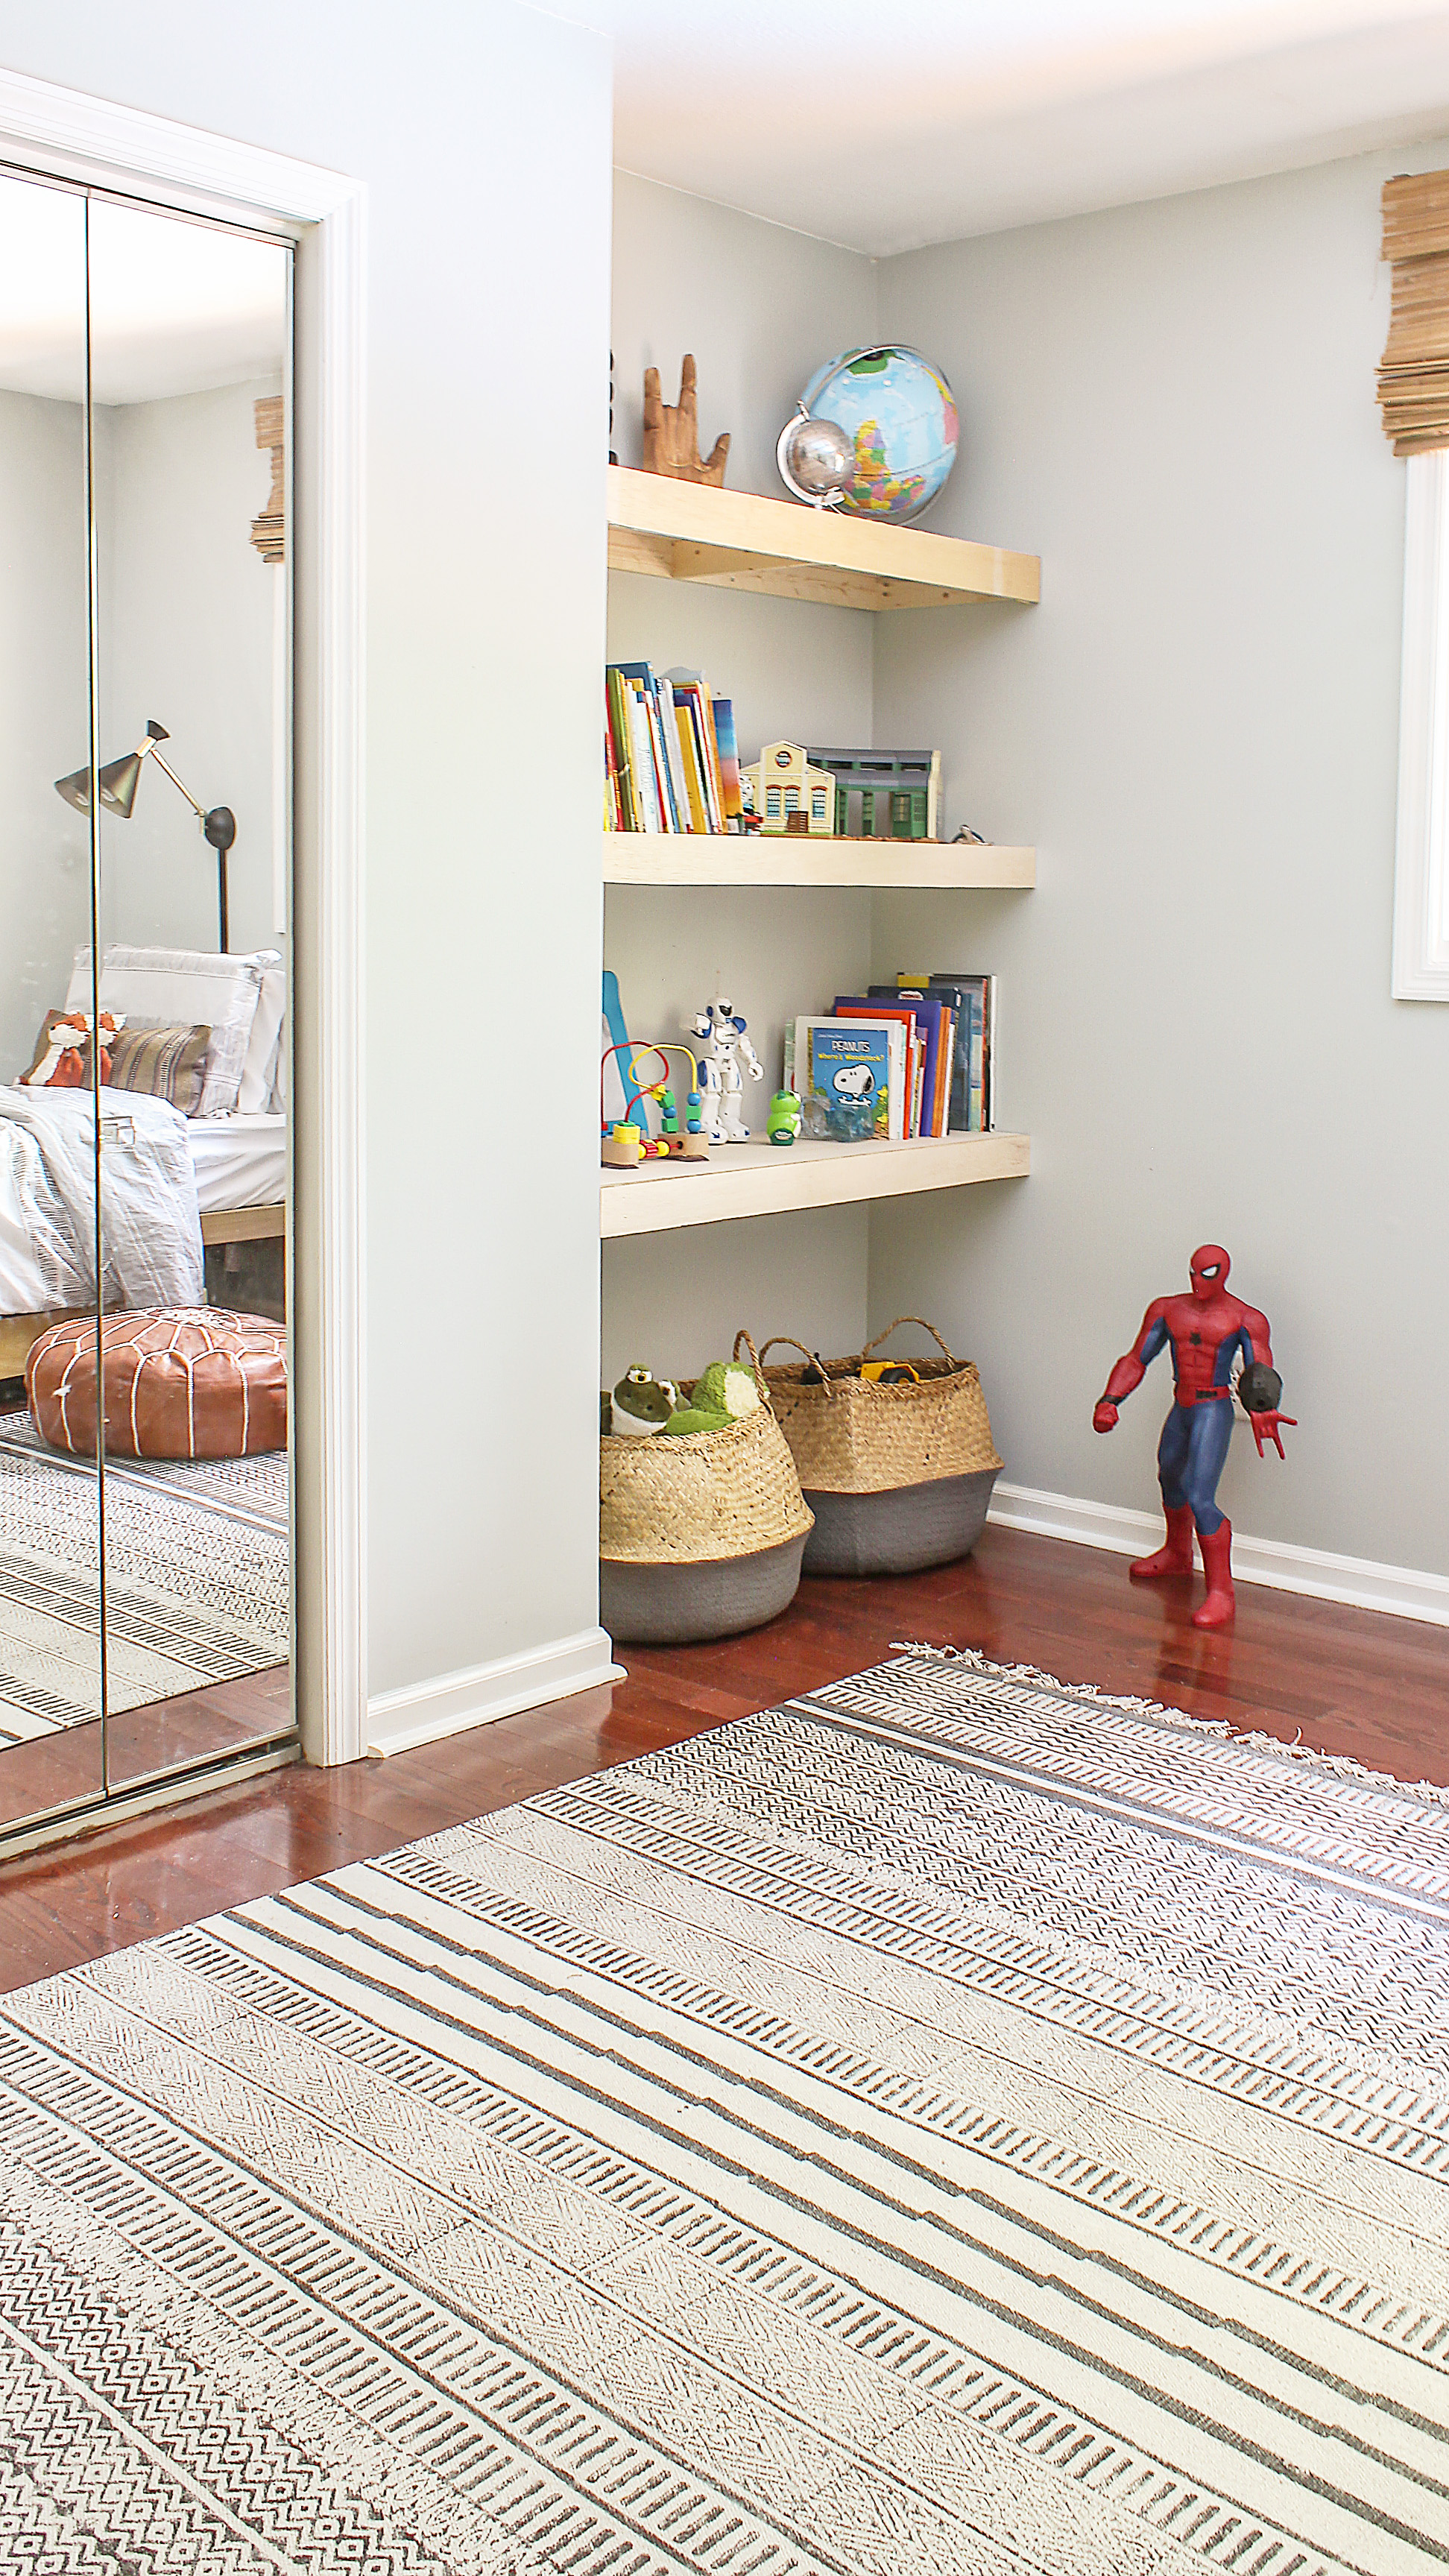
As you can see, I had completely neglected my son’s room. To make matters worse, there was an awkward nook/alcove in the space which made the floor plan a bit awkward to arrange.
Once I committed to a full blown makeover of his room, I knew I wanted to utilize the alcove, and I decided that bookshelves wood be the best use of the space. Not only would it provide some much needed storage, I thought it would give the space a more custom, high-end feel.
For those of you who who missed out on the original room reveal post , the vision for this space was a rustic, modern Scandinavian vibe. As a result, I decided to go with natural, wood materials. Let me show you how I did it.
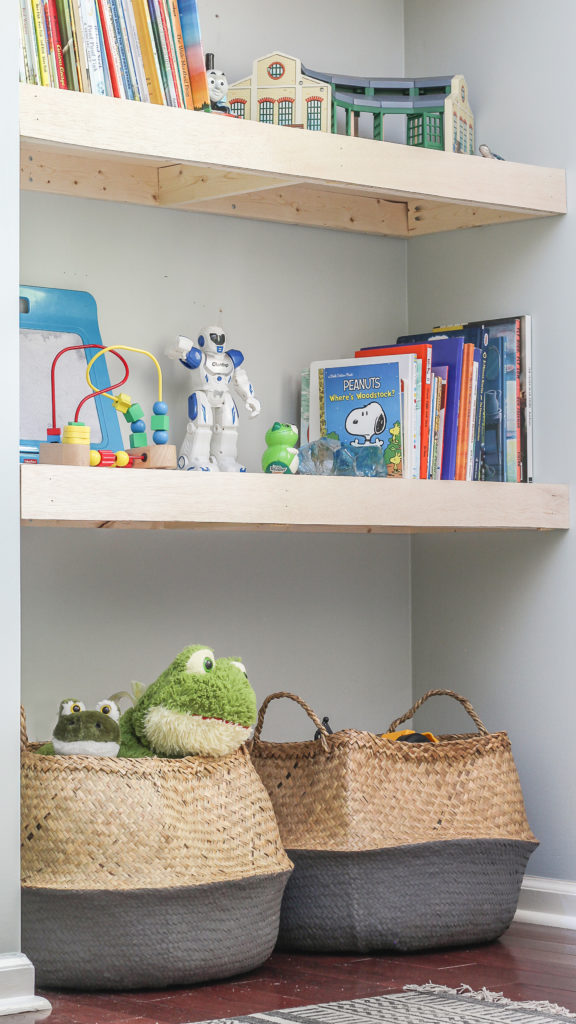
After:

Wooden ALCOVE Book Shelves Materials
- 1×2 to length
- kreg pocket hole jig
- kreg pocket screws
- miter box or miter saw or circular saw (miter saw is most preferable but any of the 3 listed will work)
- 1/4 inch plywood
- 18 GA brad nails
- nail gun and compressor
- 2 1/2” wood screws
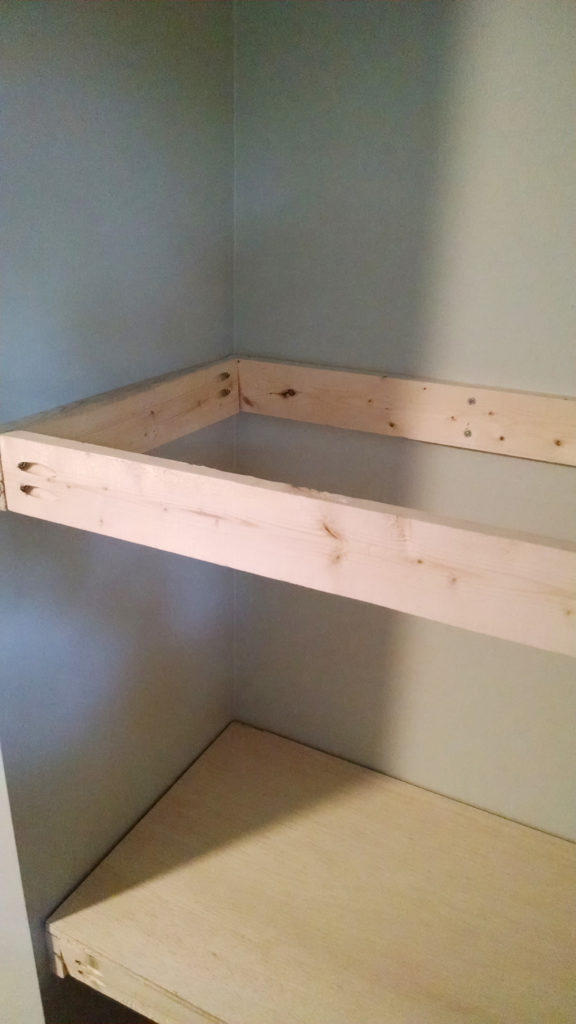
Step 1: With your saw of choice (Miter Saw is the most efficient) cut 1×2’s to length and depth.
Step 2: Locate studs and attach 1×2’s to studs with 2 1/2 wood screws.
Step 3: Attach front 1×2 to side 1×2 with brads.
Step 4: Install center 1×2 to rear 1×2 with pocket screws. Then attach center 1×2 to the front 1×2 with brads.
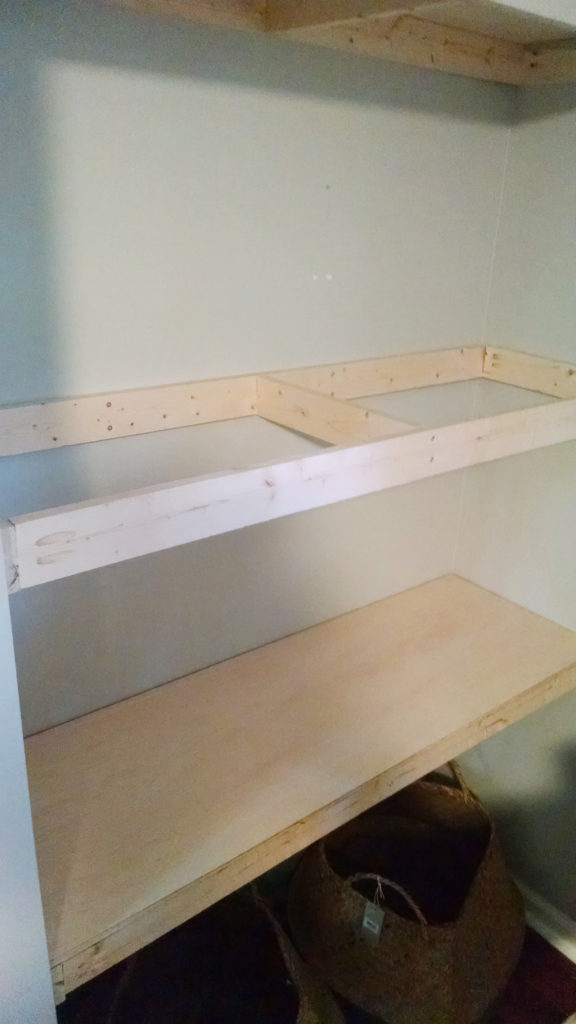
Step 5:Attach 1/2 plywood to frame with brads.

Step 6: Attach front plate to front 1×2 with brads.
Step 7: Repeat process for each shelf.
See how simple that was? Not to mention, the cost of supplies was very reasonable. I love just how much bang for your buck the DIY shelving provides.
To further elevate the look so that the center 1×2 is not visible from the bottom view, you could easily attach another sheet of plywood if you so desire. For our personal needs, the exposed bottom didn’t necessarily bother me at the time. I mean….you saw what a hot mess his room looked like before, and this was already such a vast improvement.
However looking at the photos now, I believe that the added plywood on the bottom of each shelf would have looked nicer. Then again, my son is such a freakin’ slob (God love him) … I really didn’t see the point in wasting any additional time or money covering the bottom of the wood shelving.
To give the shelves a richer look, you could also stain them (you can check out a darker, barnwood staining tutorial here and a lighter, driftwood stain tutorial here). However, I decided to keep them natural to match my son’s natural wooden toy box and further perpetuate the whole Modern/Scandi aesthetic.
Hopefully the next that I write you guys, I will be out of my “dog days of Summer” hibernation mode. Until then, be sure to get out there and design some good vibes.
If you are looking for more DIY shelving tutorials, check out my open kitchen shelving post here.
Please also show your support by Pinning….


Welcome!
My journey in interior design and home improvement began with transforming my first fixer-upper home, all while managing a budget and raising two young boys. My work, a reflection of my passion for creating beautiful, uplifting spaces, has been recognized by top publications like Better Homes and Gardens Magazine, HGTV, and more. I invite you to explore my site and witness the transformation of my home and the vibes we've designed. Read more...


The shelves look amazing. What great storage
Thank you so much, sweet friend!
Perfect timing for this post! We have hell holes of our own that would benefit from these shelves.
bahaha! That makes me so happy to hear, Brenda. Good luck with your hell holes! xoxo
Nice! I might suggest a clear coat for ease of wiping dust off in the future… have you ever tried to clean raw wood? It doesn’t. Possibly try Varathane polyurethane matte interior with “unique soft touch finish” which is actually water based/water clean up despite the polyurethane word on the can. It has gotten better reviews than matte Minwax Polycrylic and is easily available. I just used it on our kid desk for the first time and am very happy with the invisible, non shiny look but haven’t had it long enough to speak to durability yet.
On the other hand, it *is* too hot to do anything. Even the home stuff I love. Today I’m like… I could wipe down the chairs I finally finished sanding to be painted, nope, too hot. Maybe I’ll vaccuum the edges of the room that the Roomba can’t get to… nope too hot! Ok. Maybe I can change a light bulb. I’m still thinking about that one.
That’s a great point, Julie….I had a really hard time cleaning my butcher block as well (with the rough/raw texture). Sadly enough, I am such a lazy slob right now I will probably not even be cleaning it anytime soon. Hope you are enjoying your summer! xoxo