
Double Pantry Barn Door DIY – Under $90

I am so happy to finally share with you my barn door DIY for replacing boring bi-fold doors . Built for my pantry, I would have loved a true barn door on a sliding track, but the space did not allow enough room for this. So, I had to build two narrow doors.
If you have been following me, you know that when I say “I built”, I really mean (in most cases) that I nagged my husband into building something. This is how it works: I provide the vision, and he finds a way. Where would I be without him?
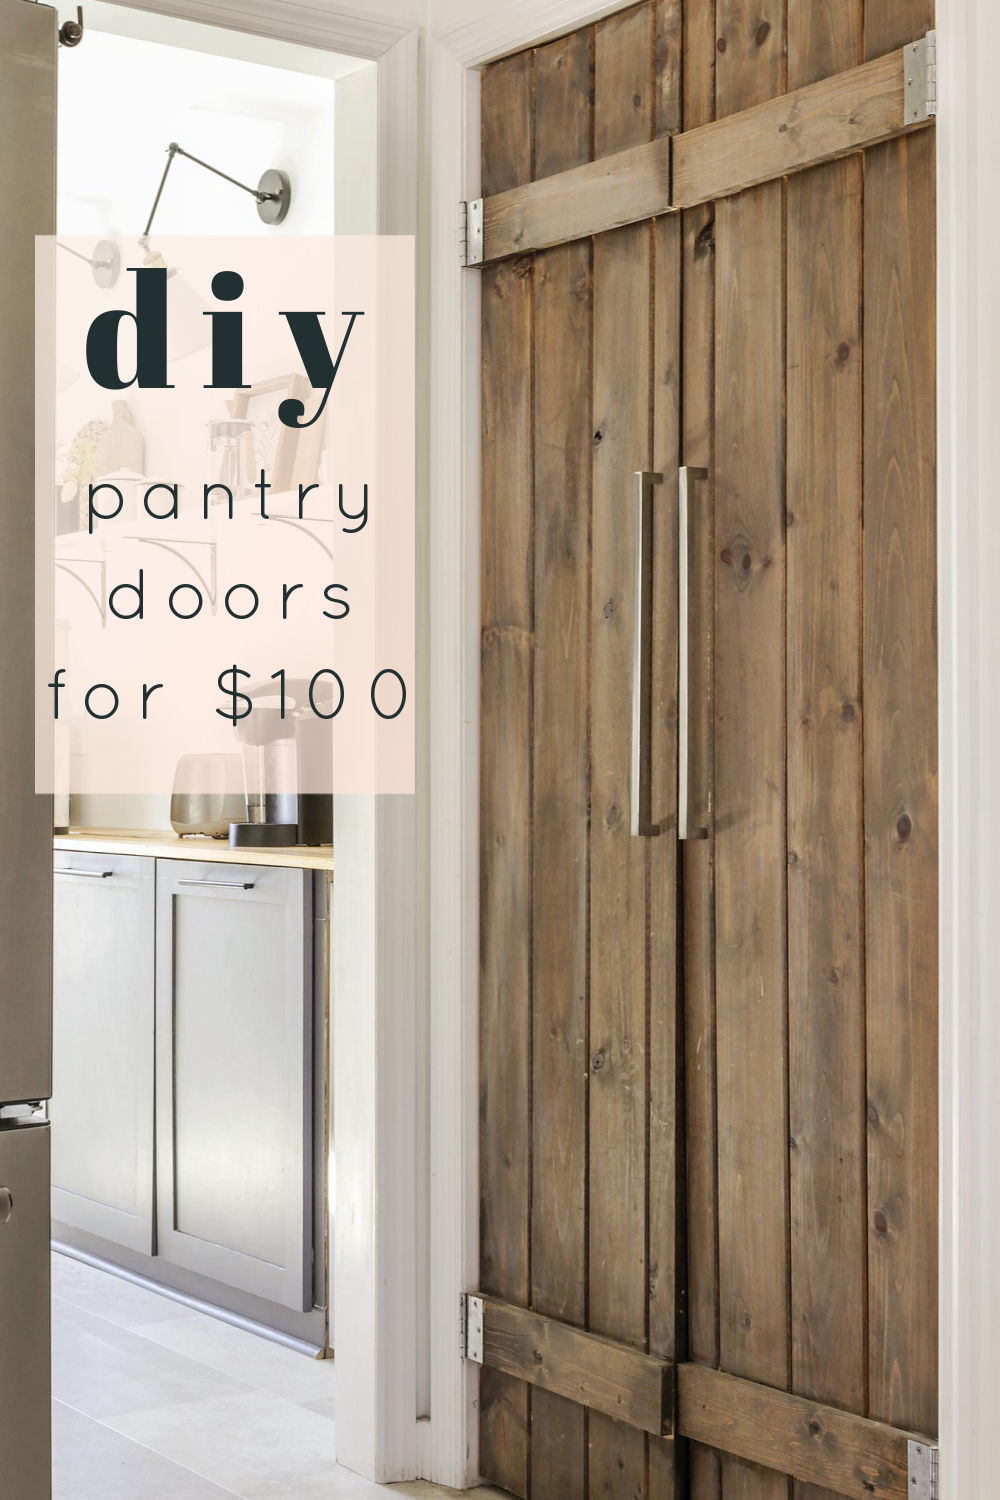
I knew I did not want the plain-Jane bi-fold doors which the opening was originally intended for. I wanted character and warmth, and I believe that is exactly what I got with the finished product. Let me share with you how we achieved this look.

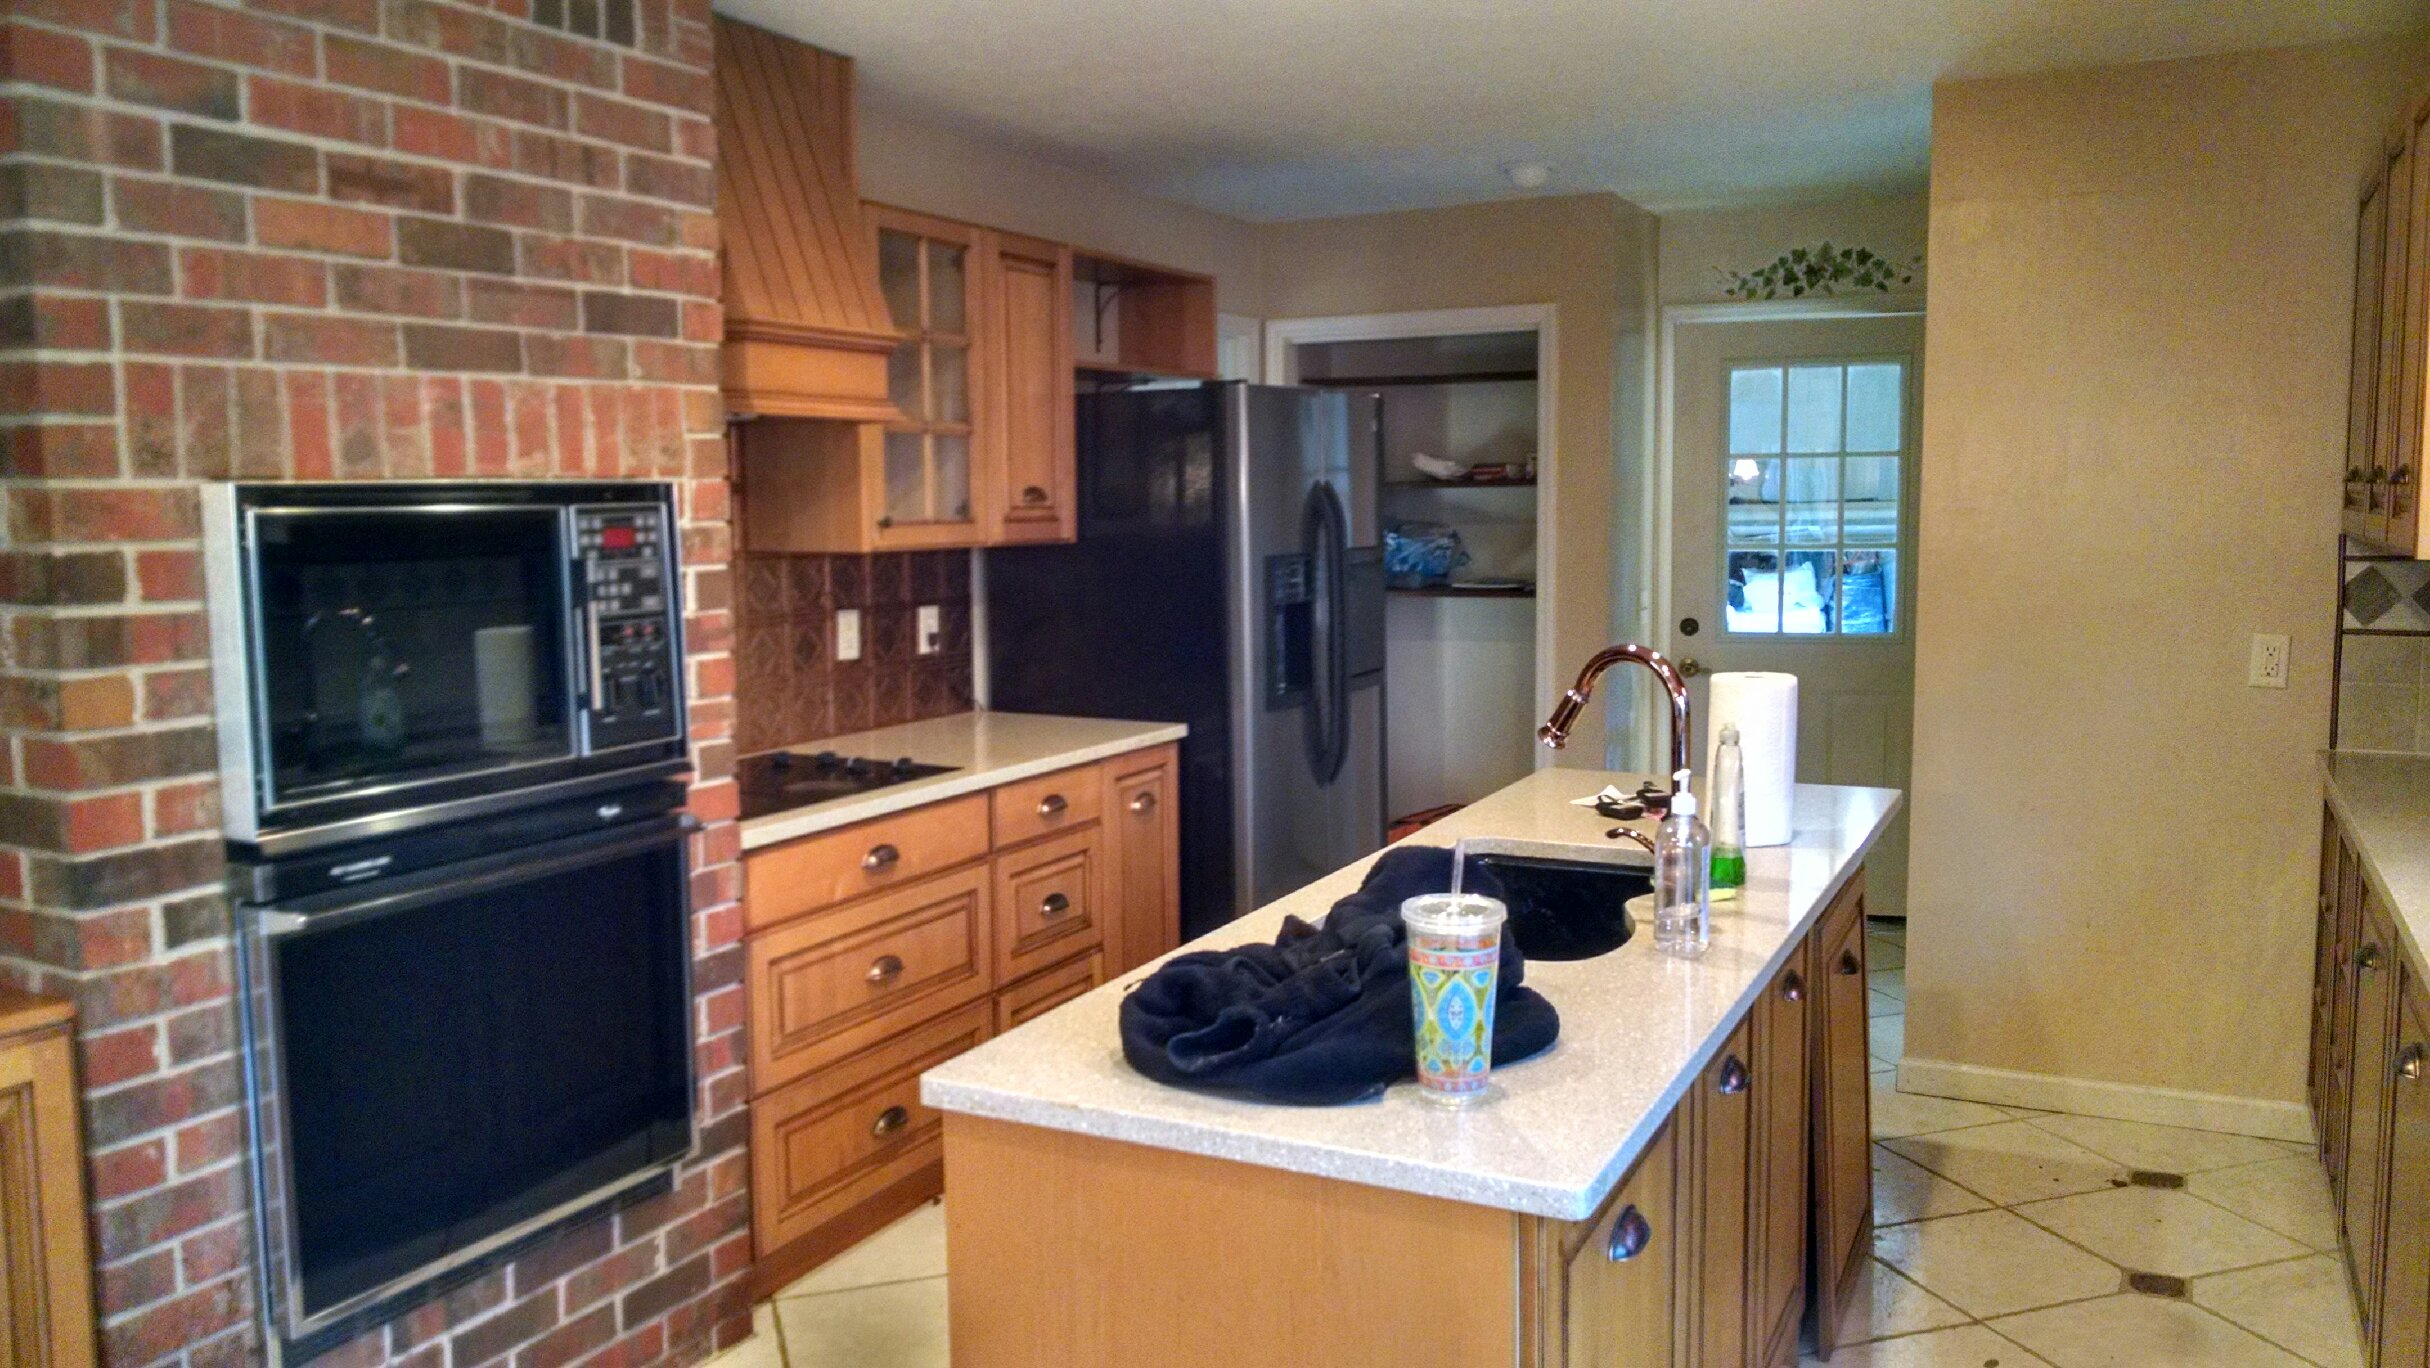
When we first moved in, the pantry doors were completely missing.
As a temporary fix, I bought a curtain panel from Target and called it a day. For months I was fine with the curtain panel solution until I reached my 17th week of pregnancy and my nesting instincts kicked in along with a strange burst of energy.
I told my husband I wanted a barn door/ re-claimed wood look.
*This post contains affiliate links. That means if you click on one of those links and buy something, I may receive a small commission, but you won’t pay a dime more. As an Amazon Associate I earn from qualifying purchases*
For those of you new to my blog, check out this before and after of our kitchen .
Here is what it looked like when we first moved in.
And here is what it looks like now…

Enough of my tangent.
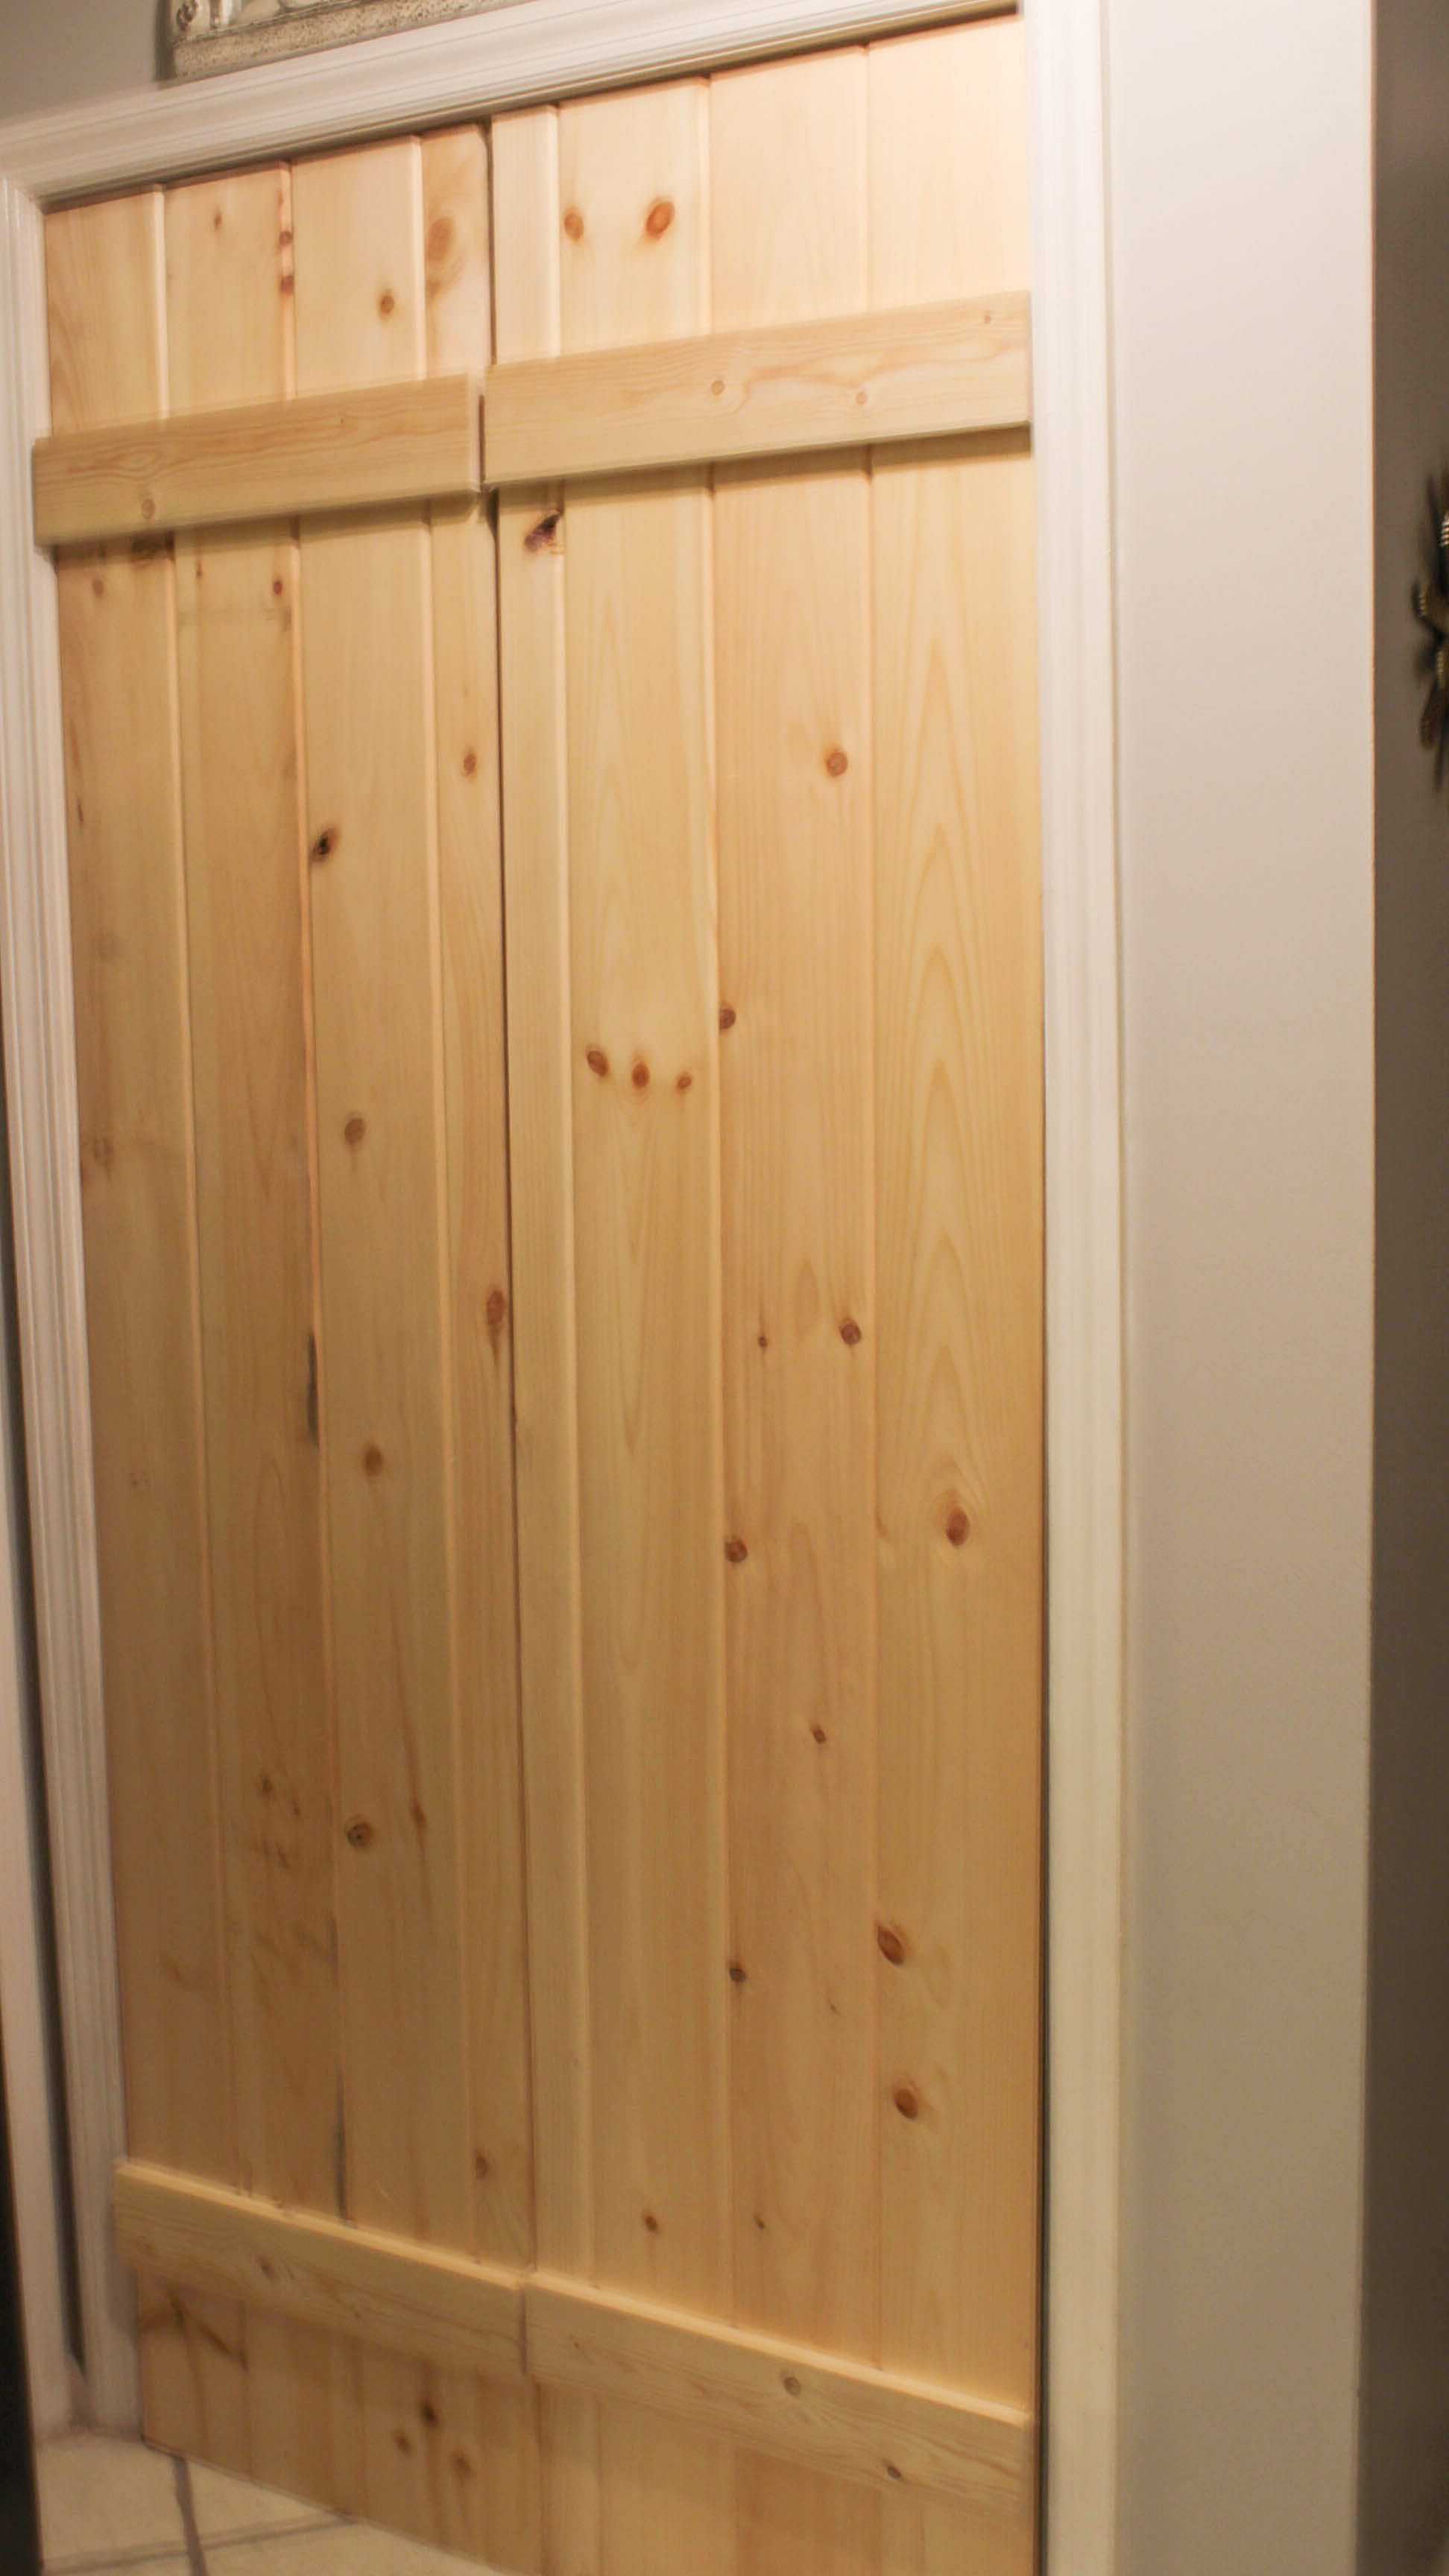
After some thought, my brilliant husband found a solution for the narrow space (which did not allow for the track function I really wanted). He built two narrow doors out of tongue and groove pattern board.
To add some “barn door” character, he attached common board horizontally. Here is a breakdown of supply cost.
-
- lumber – $50
- Hinges – $10
- 18” Chrome Handles – $30 ( or only $20 if you click here
 )
)
- paint and stain – $0 (I already had some from a previous project.)
Supplies Needed
- 1.25” wood screws (12)
- Tongue and Groove Pattern Stock Board (8)
- 1”x 4”x 6′ Common Board
- Chrome Square Door Hinges (4)
- 18” Chrome Handles (we got ours here)
- Table Saw
- this stain
- Light Gray Paint
- Wide Foam Brush
- Rag for stain
Steps for achieving this look
- Cut tongue and groove pattern board to height with table saw using 1/4” gap at top and bottom of door opening.
- With table saw, rip (cut length wise) two middle boards (the center of the doors) to width.
- Join pattern boards by tongue and groove.
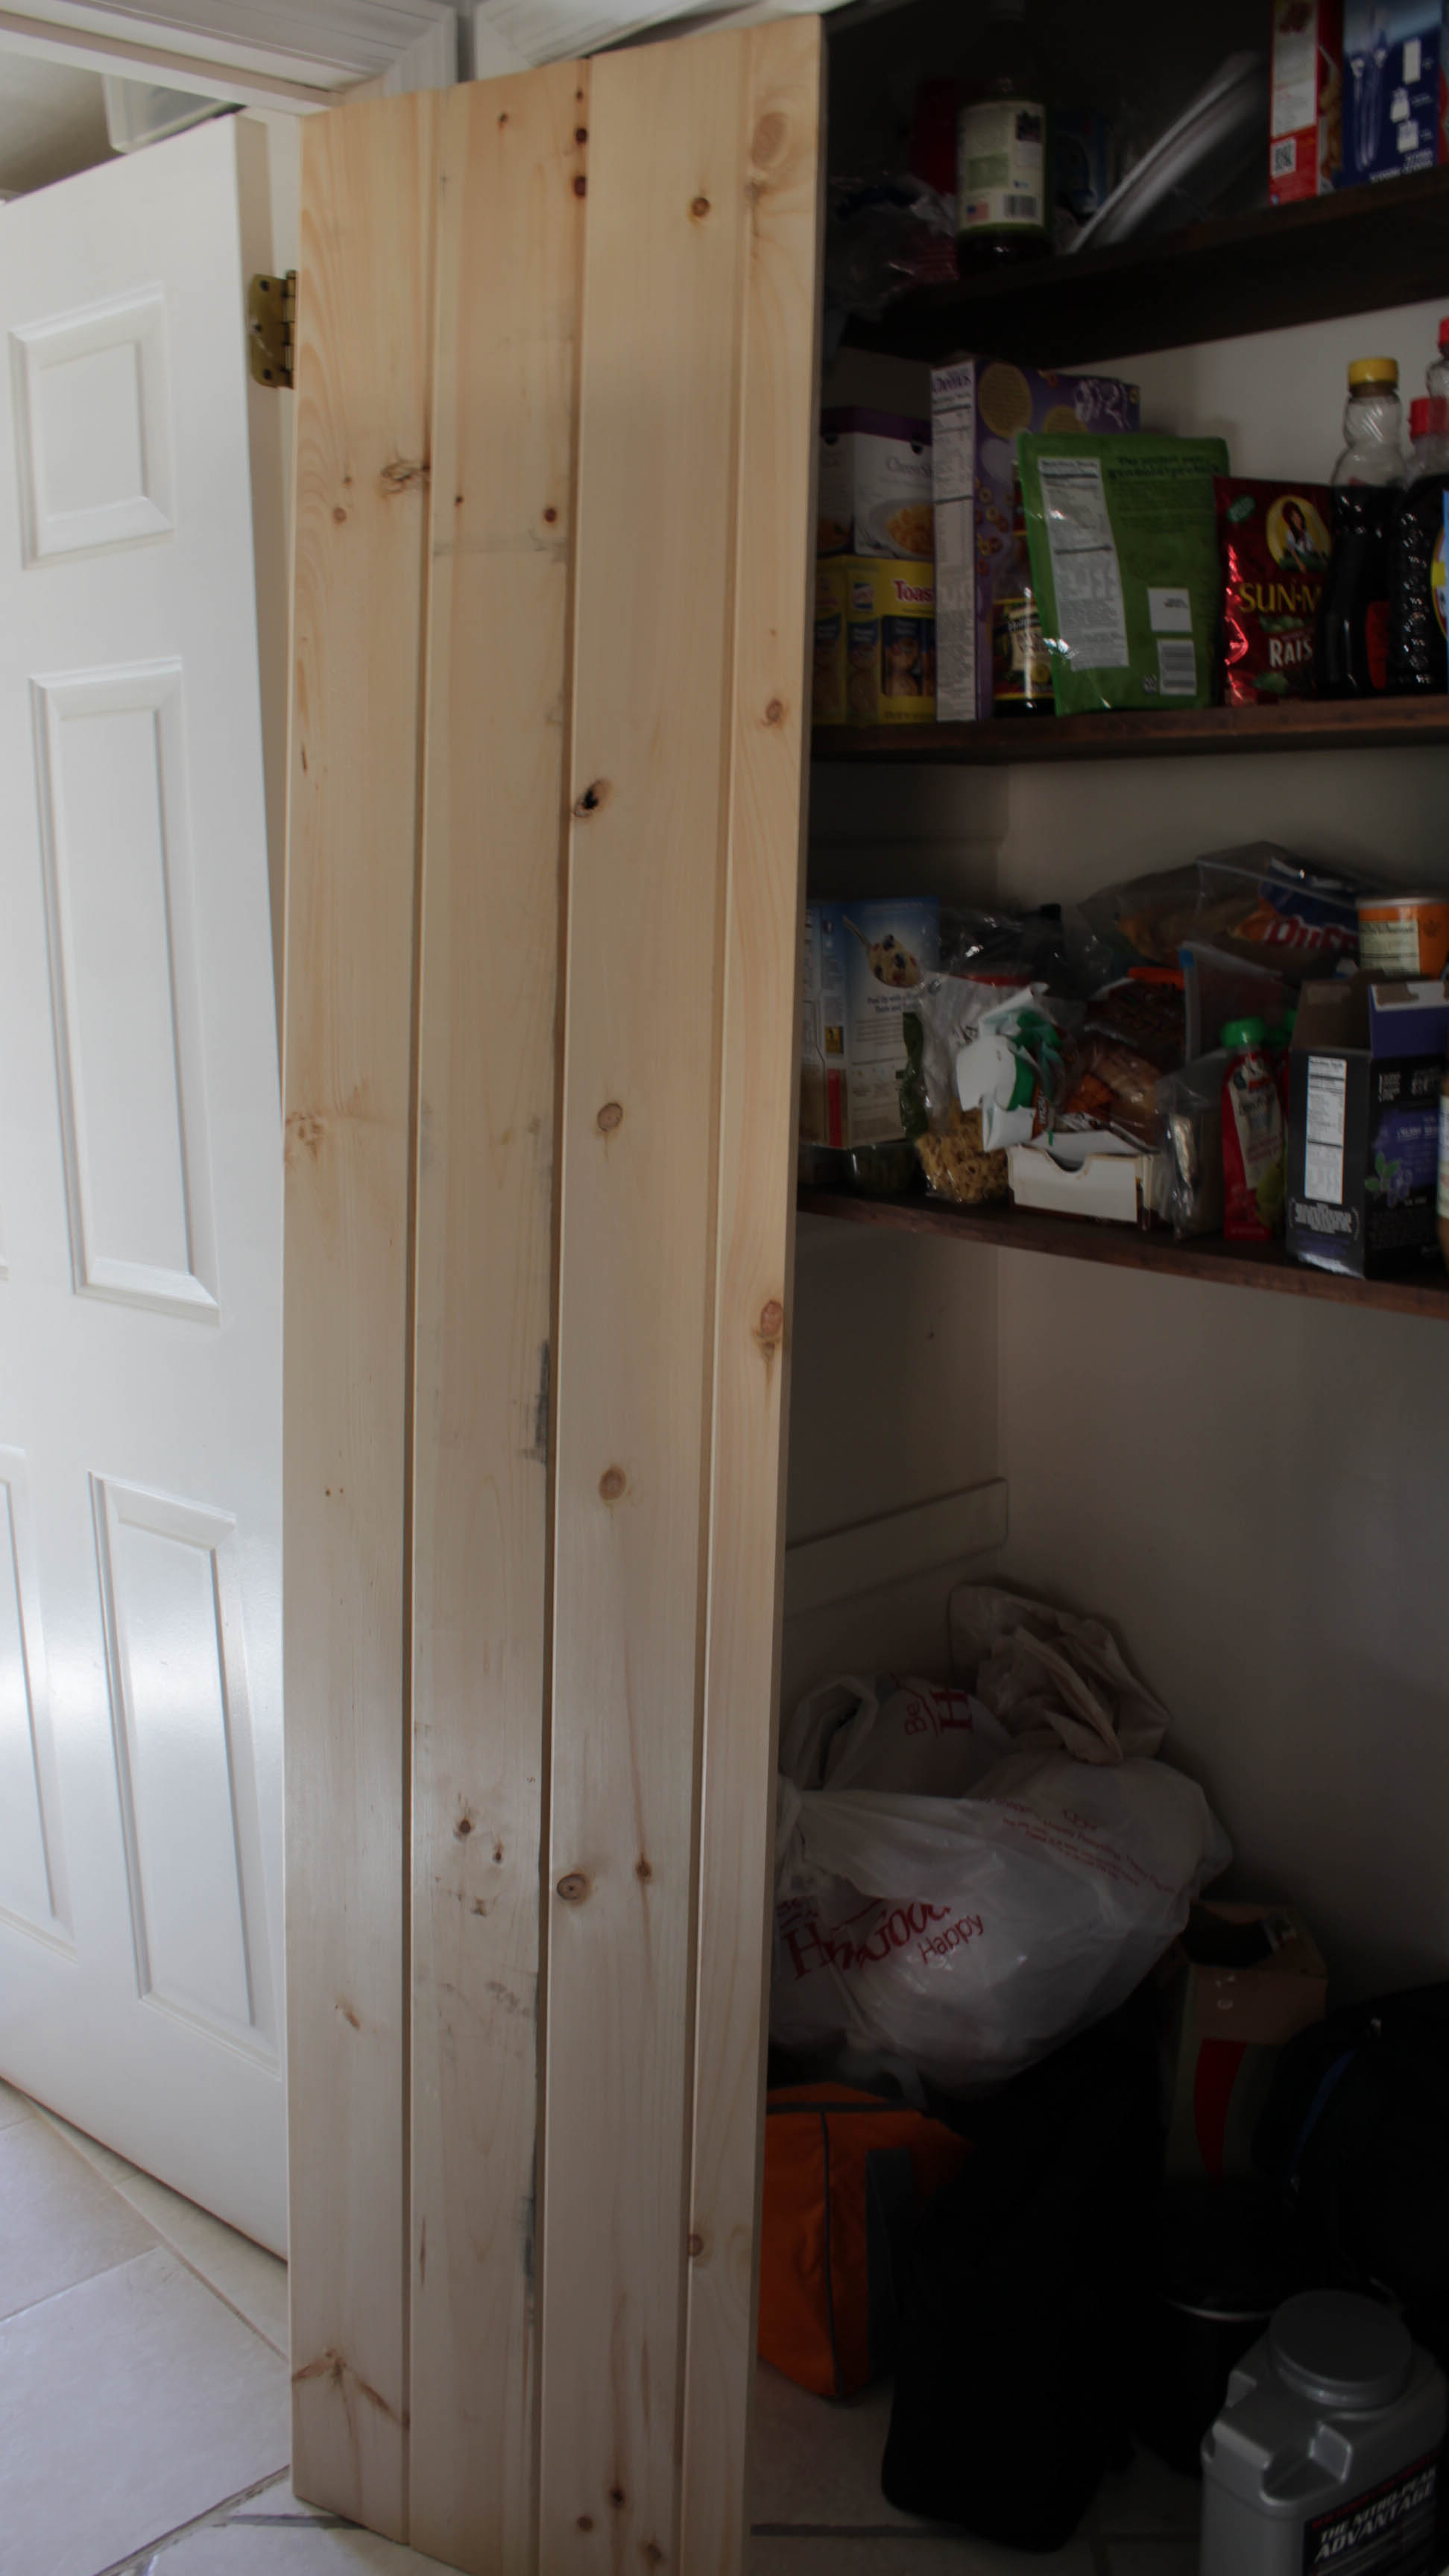 4. Cut common board to width of doors (4 pieces total).
5. Attached common board with wood screws from the backside of door so that screws are hidden.
6. Attach hinges to common board and door jamb.
Staining and Handles
- Apply stain(here is what I used)
with foam brush. Then quickly wipe and blend stain with rag.
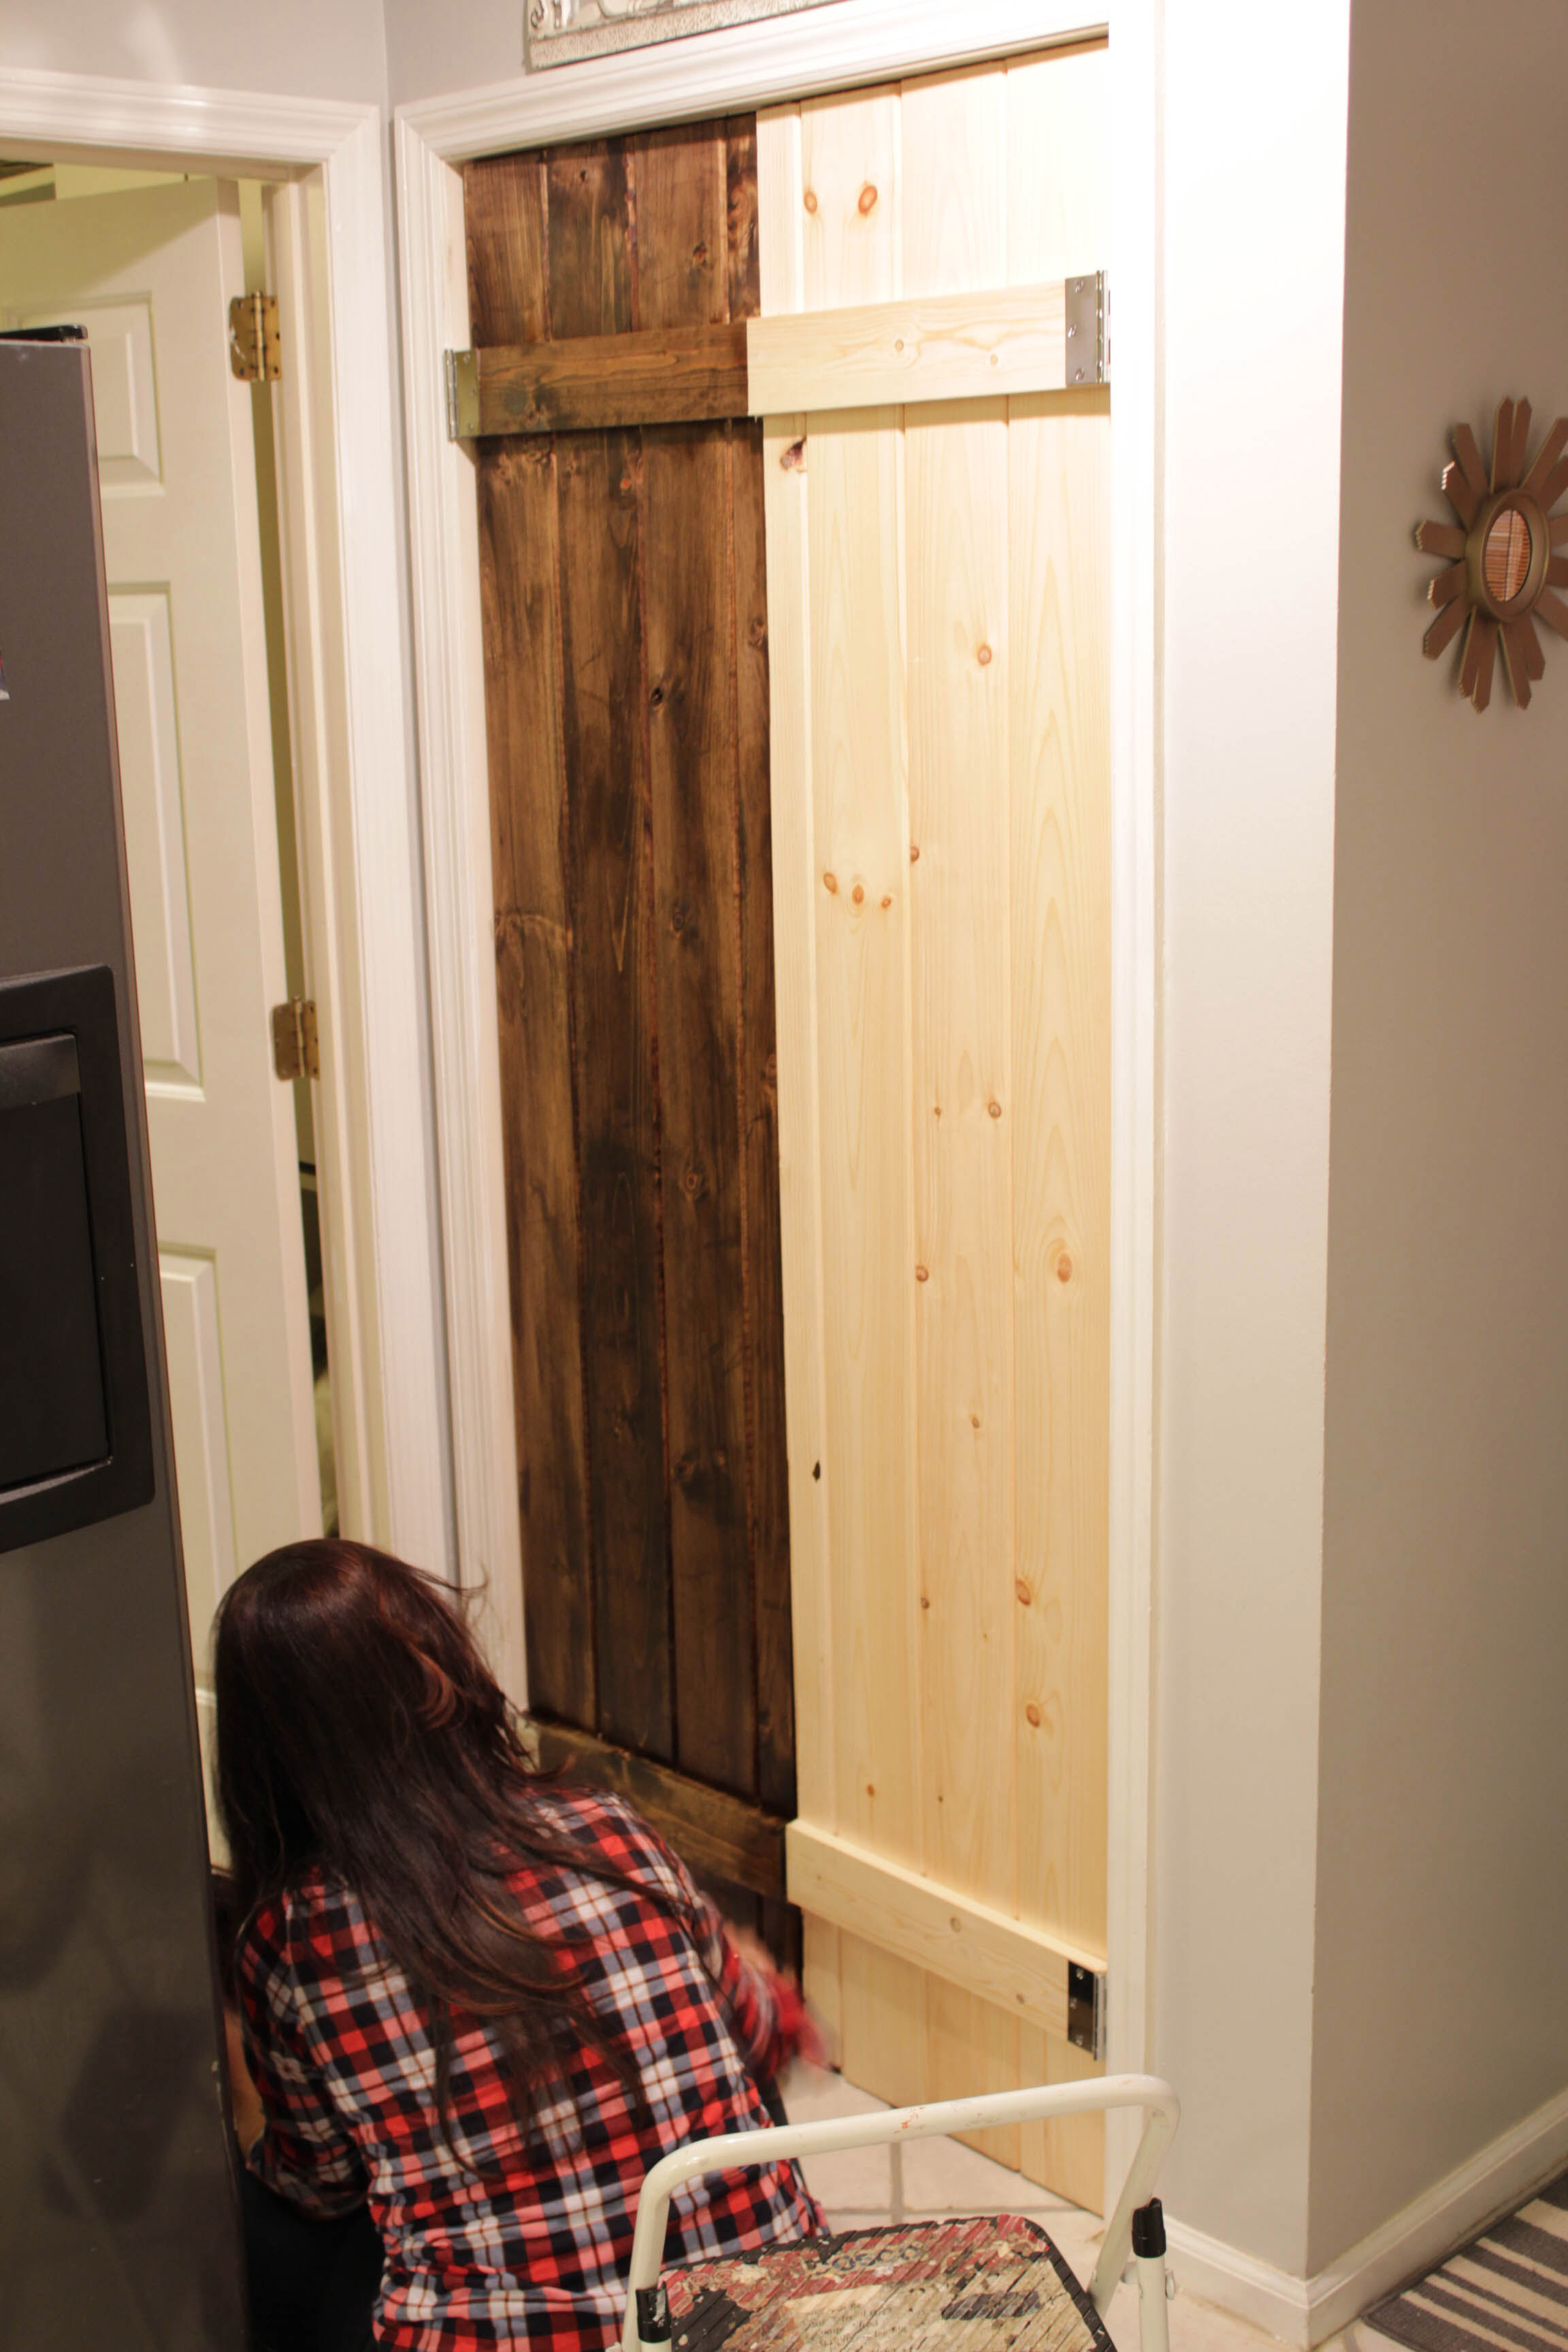
2.For weathered effect: Once stain![]() is applied, apply some diluted, light gray paint with foam brush and wipe off quickly with rag.
is applied, apply some diluted, light gray paint with foam brush and wipe off quickly with rag.
I cannot tell you the exact formula I used. I had a small, sample size of light gray paint and I added a pretty good amount of water to it….this is to be sure you do not completely cover the wood finish.
However, if the paint is too diluted, it is just going to be an ineffective, drippy mess. If not diluted enough, you will cover your wood finish. You should probably do a test area before you start.
At one point I applied too much paint, but quickly grabbed a wet rag and blended. It turned out fine! So don’t freak out….just act fast.
Note: I have applied the gray-wash formula once the stain![]() dried completely (with my DIY wood beam mantel) and I applied it without letting wood stain dry (for this project). I liked results best when I did not give wood stain time to completely dry.
dried completely (with my DIY wood beam mantel) and I applied it without letting wood stain dry (for this project). I liked results best when I did not give wood stain time to completely dry.
Special thanks to AKA Design for the wood weathering idea. You can read her tutorial here.
3. Attach handles. (You can purchase the handles here![]() ).
).
4. To make door close, we also installed magnetic cabinet closures.
5. Have a strong drink(for me please) and enjoy your new doors! Or maybe the strong drink should’ve been step #1. I know if I weren’t pregnant, this would’ve been the case.
If you guys dig DIY projects with a Modern Farmhouse Vibe, you may also want to check out my DIY Floating Bathroom Vanity tutorial by clicking here. Love the look of a custom mudroom? See how we built ours for under $200… just click here for the tutorial.
Hope this helped some of you! Now go out there and design some good vibes!
And please don’t forget to share the love and pin this post!
More DIY Door Tutorials:
If you are interested in DIY barn door tutorials, you may also want to check out my DIY Sliding Barn Door post which is ideal for closets by clicking here. And also my tutorial for how to easily upgrade an existing bi-fold closet door by clicking here.


Welcome!
My journey in interior design and home improvement began with transforming my first fixer-upper home, all while managing a budget and raising two young boys. My work, a reflection of my passion for creating beautiful, uplifting spaces, has been recognized by top publications like Better Homes and Gardens Magazine, HGTV, and more. I invite you to explore my site and witness the transformation of my home and the vibes we've designed. Read more...


I love this barn door idea. I am going to use this idea in my new house. Thanks so much for sharing.
Thank you so much for checking it out! I am very happy with the results. Hope you have a happy Thanksgiving!
Beautiful! Love this idea. Thanks for sharing 🙂
Thank you so much, Chellie! Have a happy Thanksgiving!
Love your doors and the kitchen too! I would love if you share it at the party we have each Tuesday http://sweethings.net/two-uses-tuesday-56/
Happy Thanksgiving!
Hugs,
Pili
Thank you so much! I am always up for a link party. What time is it? and I will definitely check it out.
Wow – what a great project! I’ll be featuring your door at The Scoop this Monday night. Thank you for linking up!
Yay!!! I am so honored, Suzy! Hope you had a wonderful Thanksgiving.
Hi, that color is so beautiful, i would really love to copy it on my kitchen backdoor. Is that the same color on your backdoor ? It’s kind of hard to tell if it’s different from your pantry doors. Your husband did an awesome job on building it too, it really looks like a barn door. Beautiful job on the rest of the kitchen, i am going to paint my kitchen white with a color called Coos Bay blue ( can’t remember the brand ( sorry !) It’s out in the garage and its freezing out there !) But anyway it’s a beautiful blue for the center island and lower cabinets. I really think i need that warm wood, to warm it up a bit. Thanks for sharing your beautiful kitchen with all of us.
Hi Diena. The color on the walls in my kitchen is Sherwin Williams Passive. The color on the pantry doors is a mix of dark walnut stains and light grey whitewash. Hope this helps!
P.S. Pinning and saving !! ( :
I really appreciate it, Diena!!!
Hi Erica,
Your pantry doors turned out just lovely! Thanks so much for the details so perhaps one day I can recreate these doors for my own home (of course I am pinning this!). I love everything your are doing with your home. Cannot wait to see what you have in store for the outside!
Cheers,
AJ
Thank you so much, AJ! That means so much to me.
What a great solution for what looks like an awkwardly accessed area. The project made me check out your blog, Erica. What a beautiful esthetic you have – you’re really talented. You have the ability to create beautiful spaces without making them feel staged and contrived. Susan
Thank you so much, Susan. That means so much to hear!!!
This is a perfect solution for my pantry! Where did you apply the cabinet magnets to keep the door closed?
I am so glad you found it helpful, Jen. We placed the magnets on the upper/center of the actual door frame and the magnetic plates were placed on the top, back side of the doors.
Love love!! I have a very small pantry in the house we just built….no interior doors anywhere yet! The door width of my pantry is only 22″ wide. Do you think doing only one door would work? Should I cover the rough lumber on the inside of the door frame with a trim or just paint white?? We are DIY’ing most of this house! Thx for any tips/advice!
Thank you so much for the feedback! I think just one door would be best, Tara. I am not sure what you are referring to with the door frame trim. Hope this helps!
LOVE these doors. Planning on doing this with our Pantry for sure, except with a single door for ours. I have a question though? When they open do they open all the way? For instance, can it swing all the way open if it were in a hallway to the back door and you can still walk down the hallway???
Thanks, Andrea. The doors open all of the way. Hope this helps!
what kind of light grey paint did you use? wanting to achieve this color with the table i’m working on right now.
I had a sample of “Rocky Mountain Sky” by Behr from another project that I decided to use for the whitewash technique. hope this helps!
Hi there! So you put hinges on the outside? Or is like in the regular spot when you put up new doors? A little confused!
Hi Liz. I put the hinges on the outside. Sorry for the confusion.
You have helped me finally decide how to deal with my tiny pantry door that also doesn’t have room for a sliding barn door! I’m cutting the wall open and building these. Not sure why I didn’t think of this sooner. I built my own door for my chicken coop. Thanks for the lightbulb!
Yay!I am so happy to hear I could inspire you. Good luck! 🙂
Where did you purchase your lumber? The cheapest I seem to be able to find is 10.00 a board.
Hey Kim! We bought the common board at either Lowes or Home Depot. They are located right next to each other, so I have trouble remembering.
These are fabulous! I can imagine something like this in my house.
Thank you so much, Yolanda. I am so happy with how they turned out.
We just redid our kitchen and this door is perfect for the pantry! Heading to Home Depot tomorrow to get the supplies. Thanks for the idea!!
So glad you find my tutorial inspiring. Good luck with your project, Belinda.
HI ..First I LOVE LOVE LOVE this!! Quick question. The link goes to handles in a brushed nickel? Are these the ones you used? They look like more of a chrome finish? Thanks!
Kathy, I am so sorry about that. You are correct. My handles have a chrome finish.