
DIY Front Door Makeover with Gel Stain
I have officially returned from my holiday sabbatical with a cost-effective front door transformation tutorial.
Today, I am going to show you how to make a painted exterior door look like a stained wood door (for under $50!!!!).
In the words of Elton John, the b*tch is back!
You see… I had originally intended on sharing this DIY hack before the holidays (hence the Christmas wreaths adorning the doors) but as I sometimes do, I fell into a state of depression (perhaps a case of Seasonal Affective Disorder?) and couldn’t seem to get my sh*t together.
In fact, for the past month, I was essentially a useless glutton- laying in bed feeling sorry for myself and allowing my children to trash the house.
Well….it’s a new freakin’ year, and I am ready to shed my funk, along with the holiday-induced weight, and get back to business.
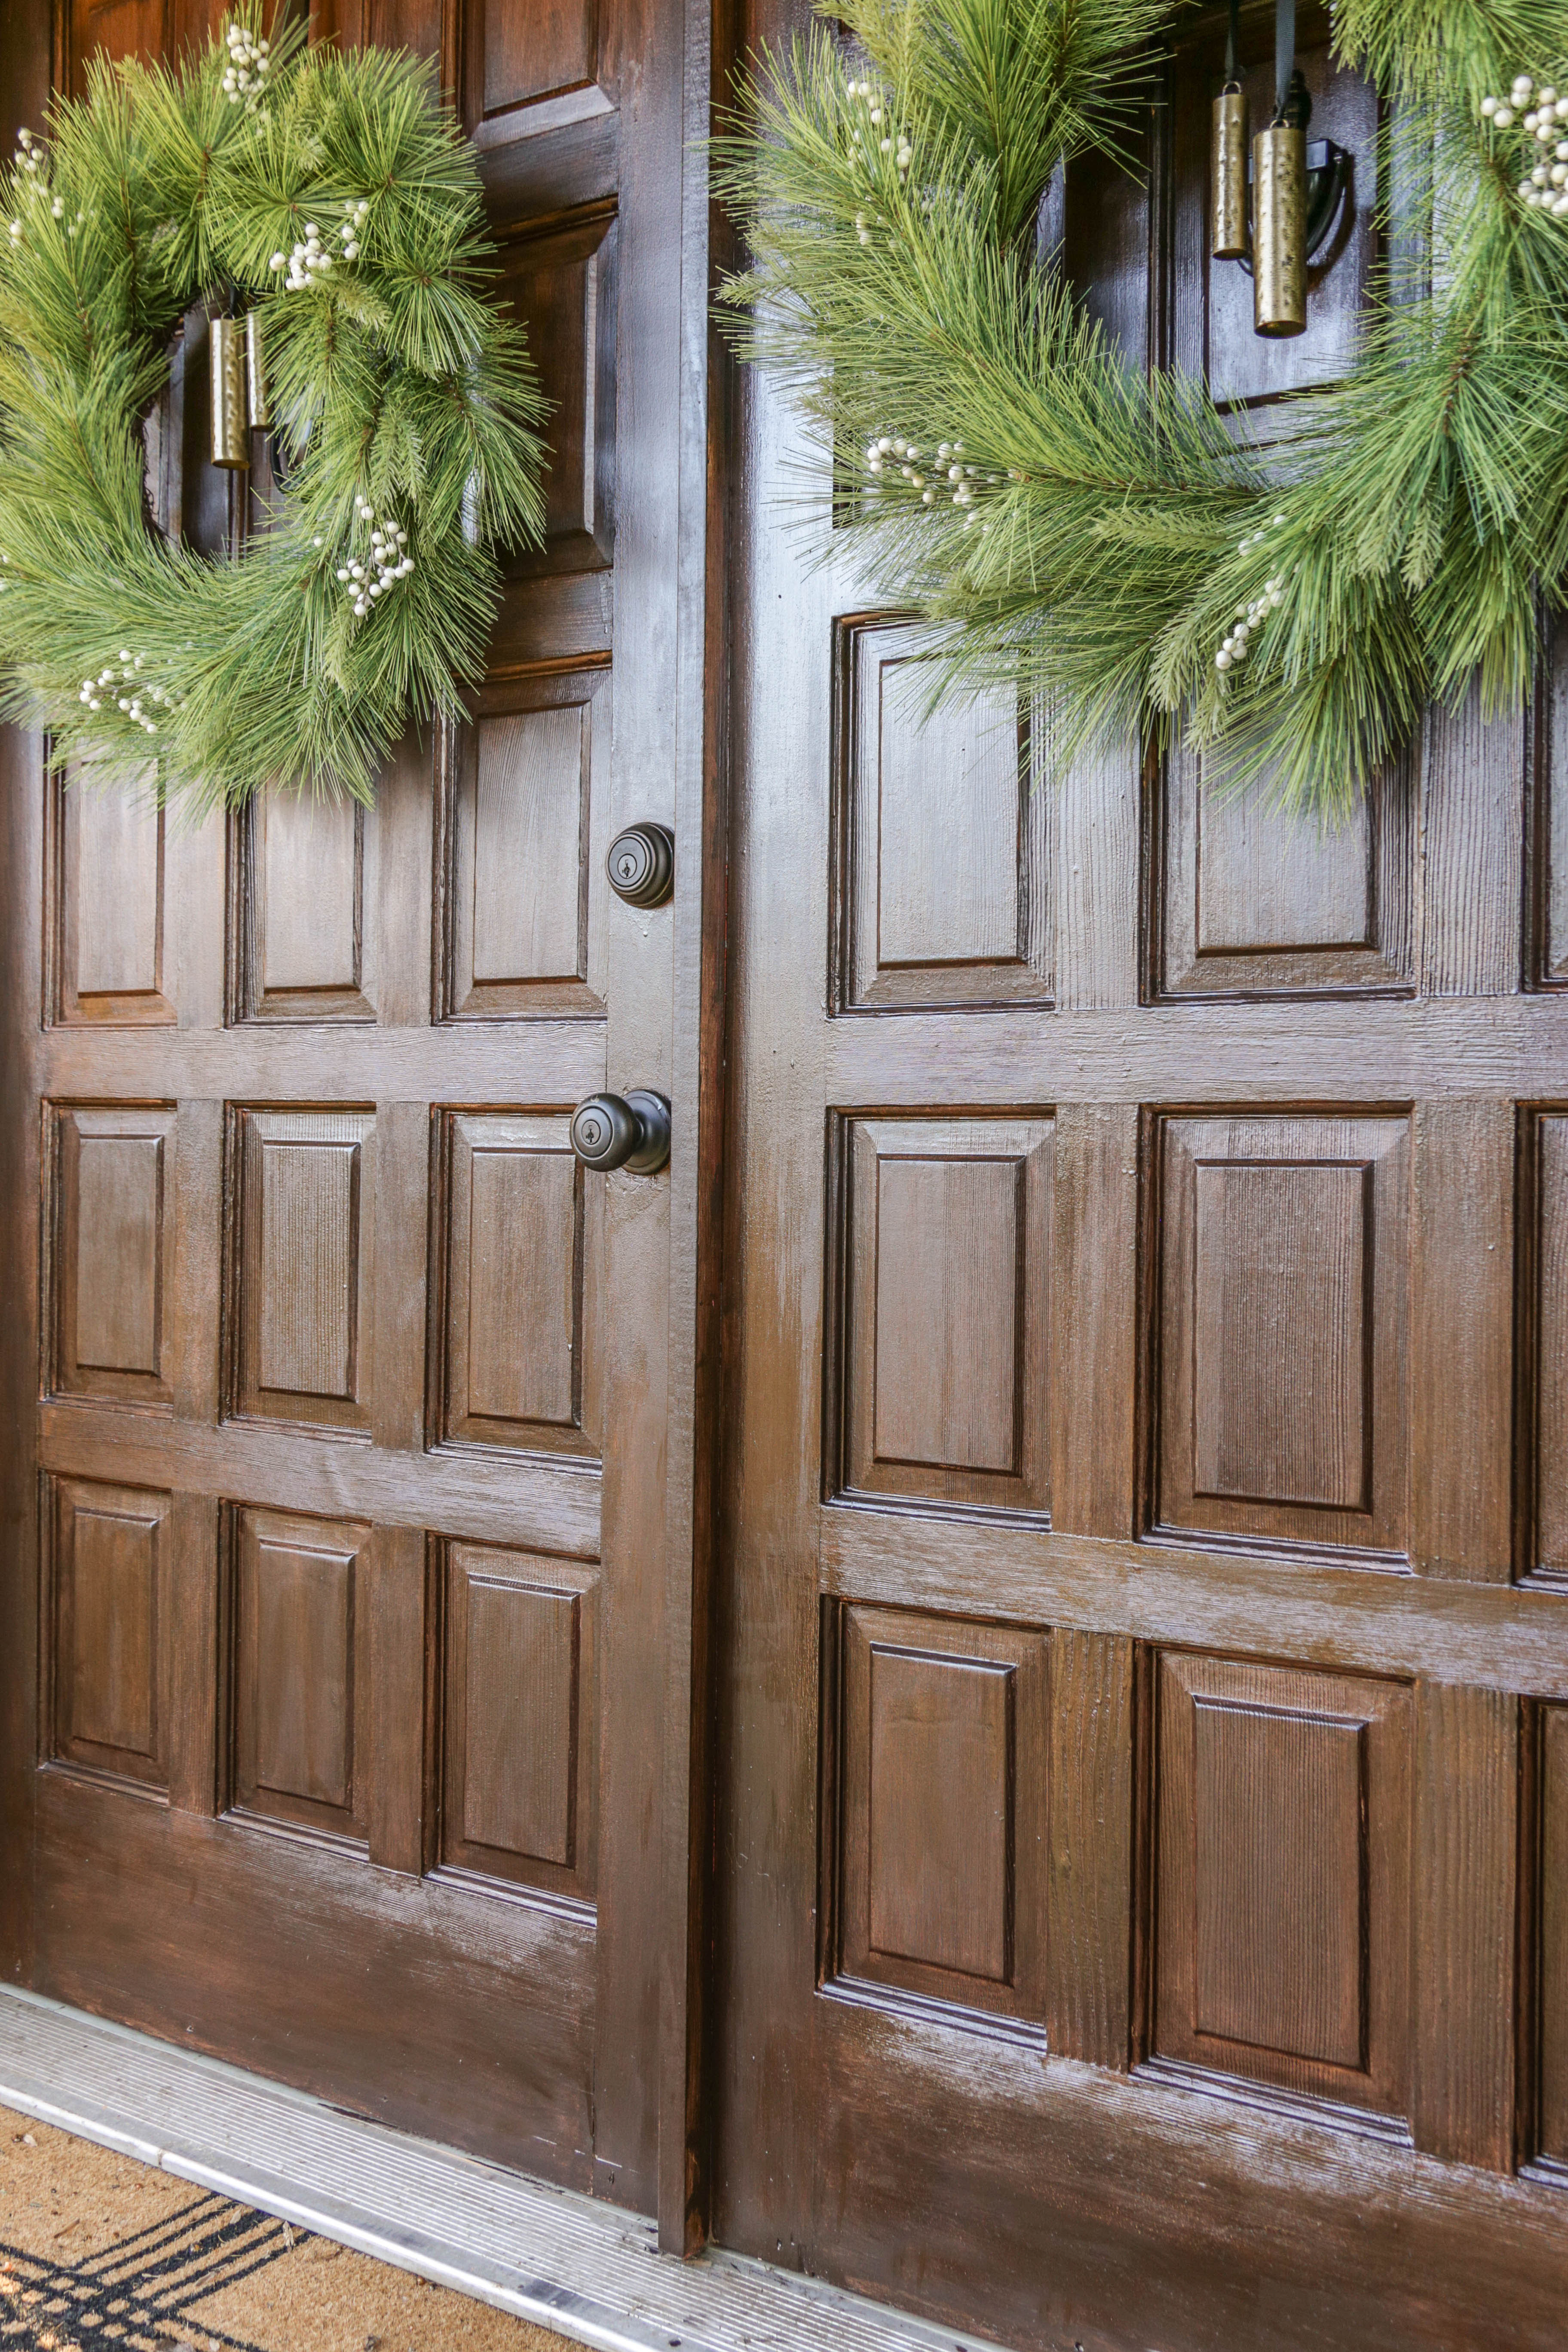
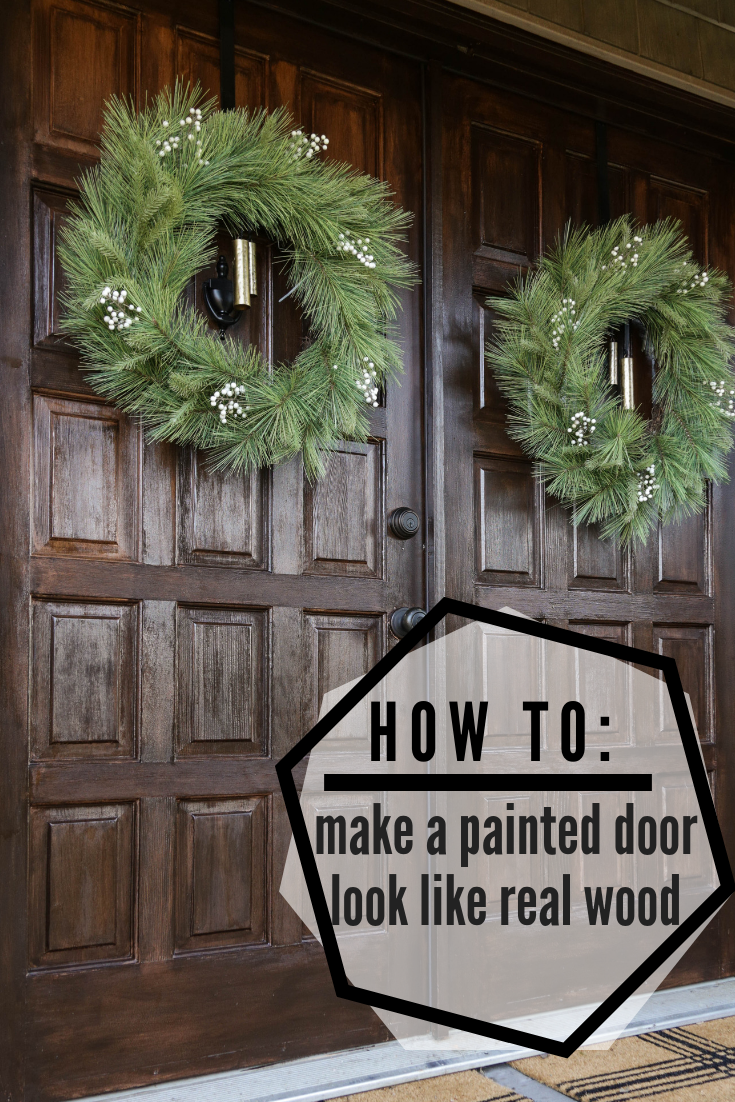
Let me show you how I stained my painted front doors to give them a “wooden” finish….
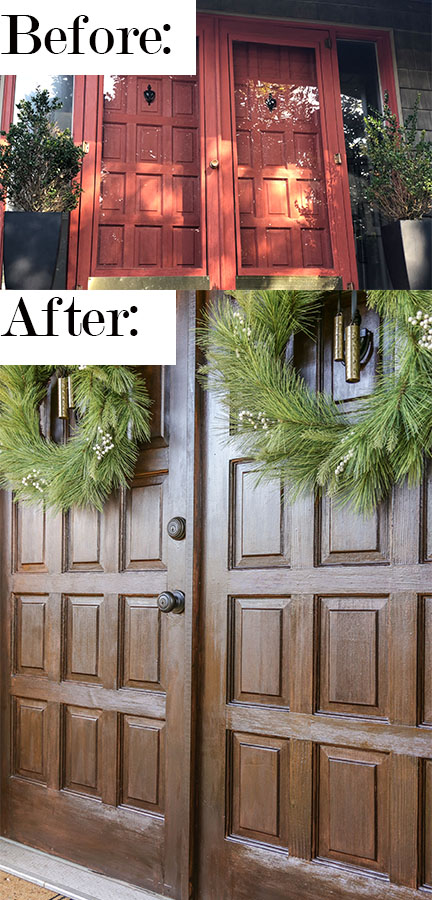
To appreciate the transformation, let me show you what I was working with.
Below is what my front doors originally looked like….
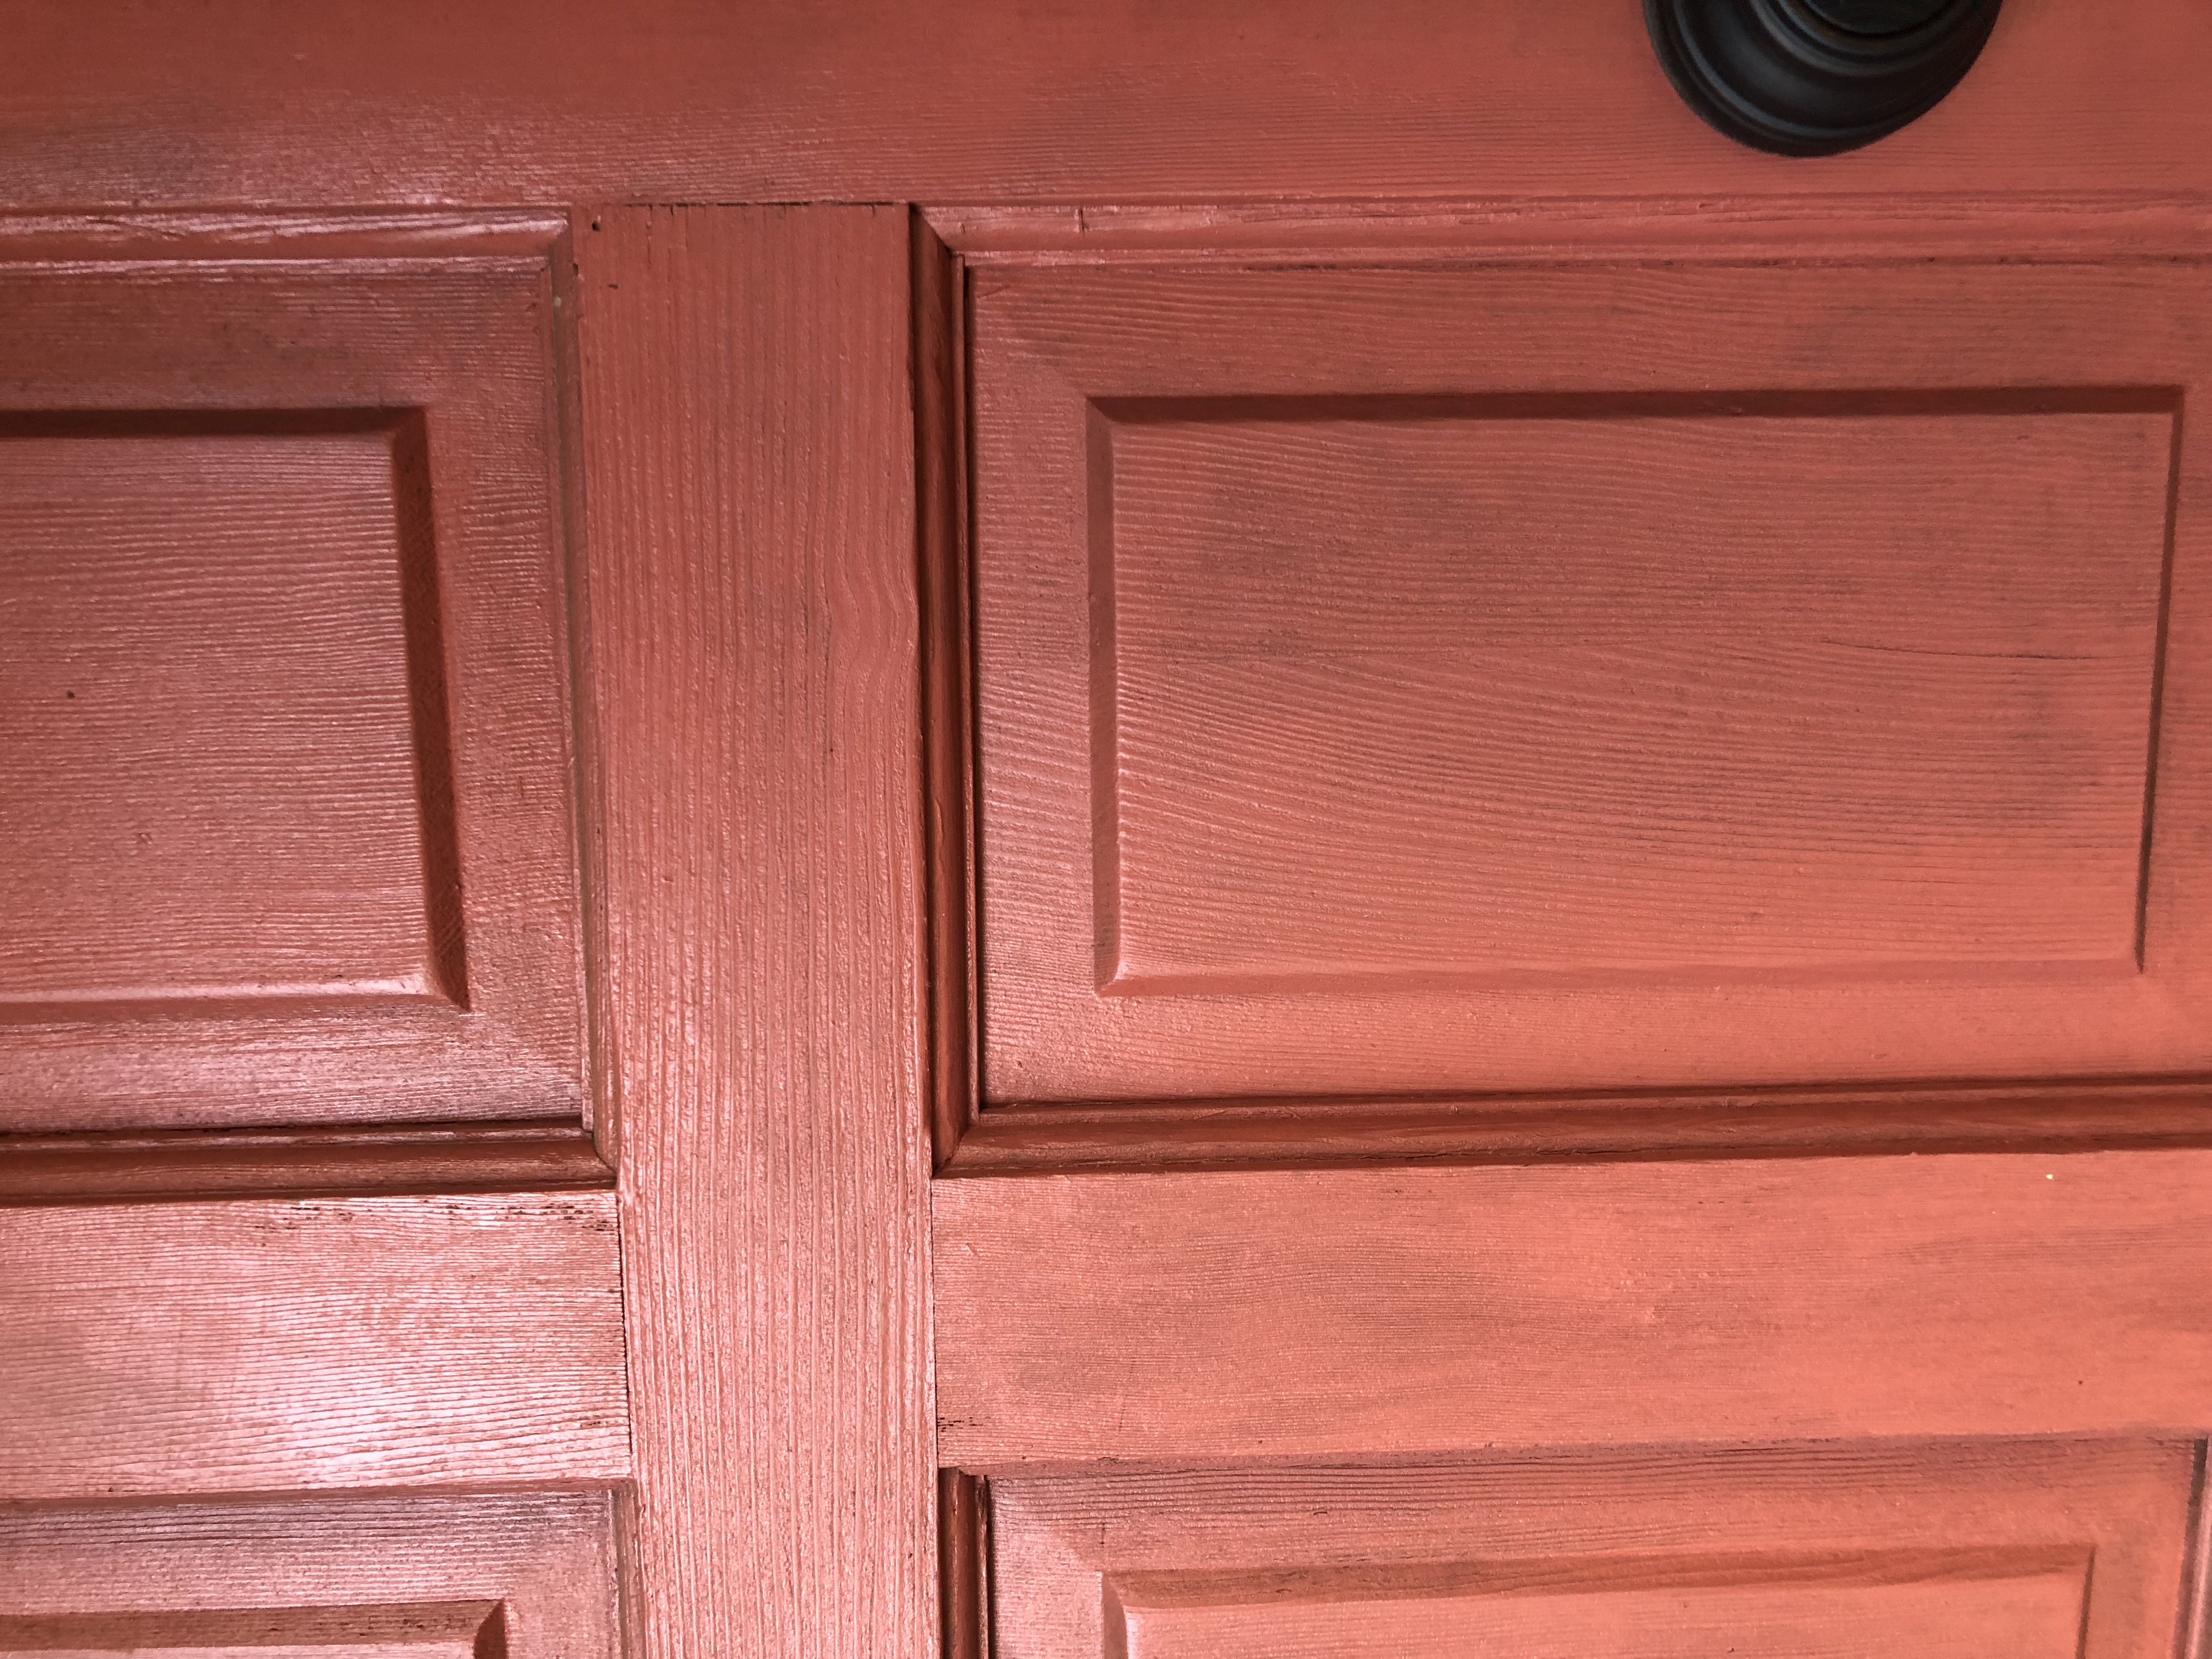
Before:
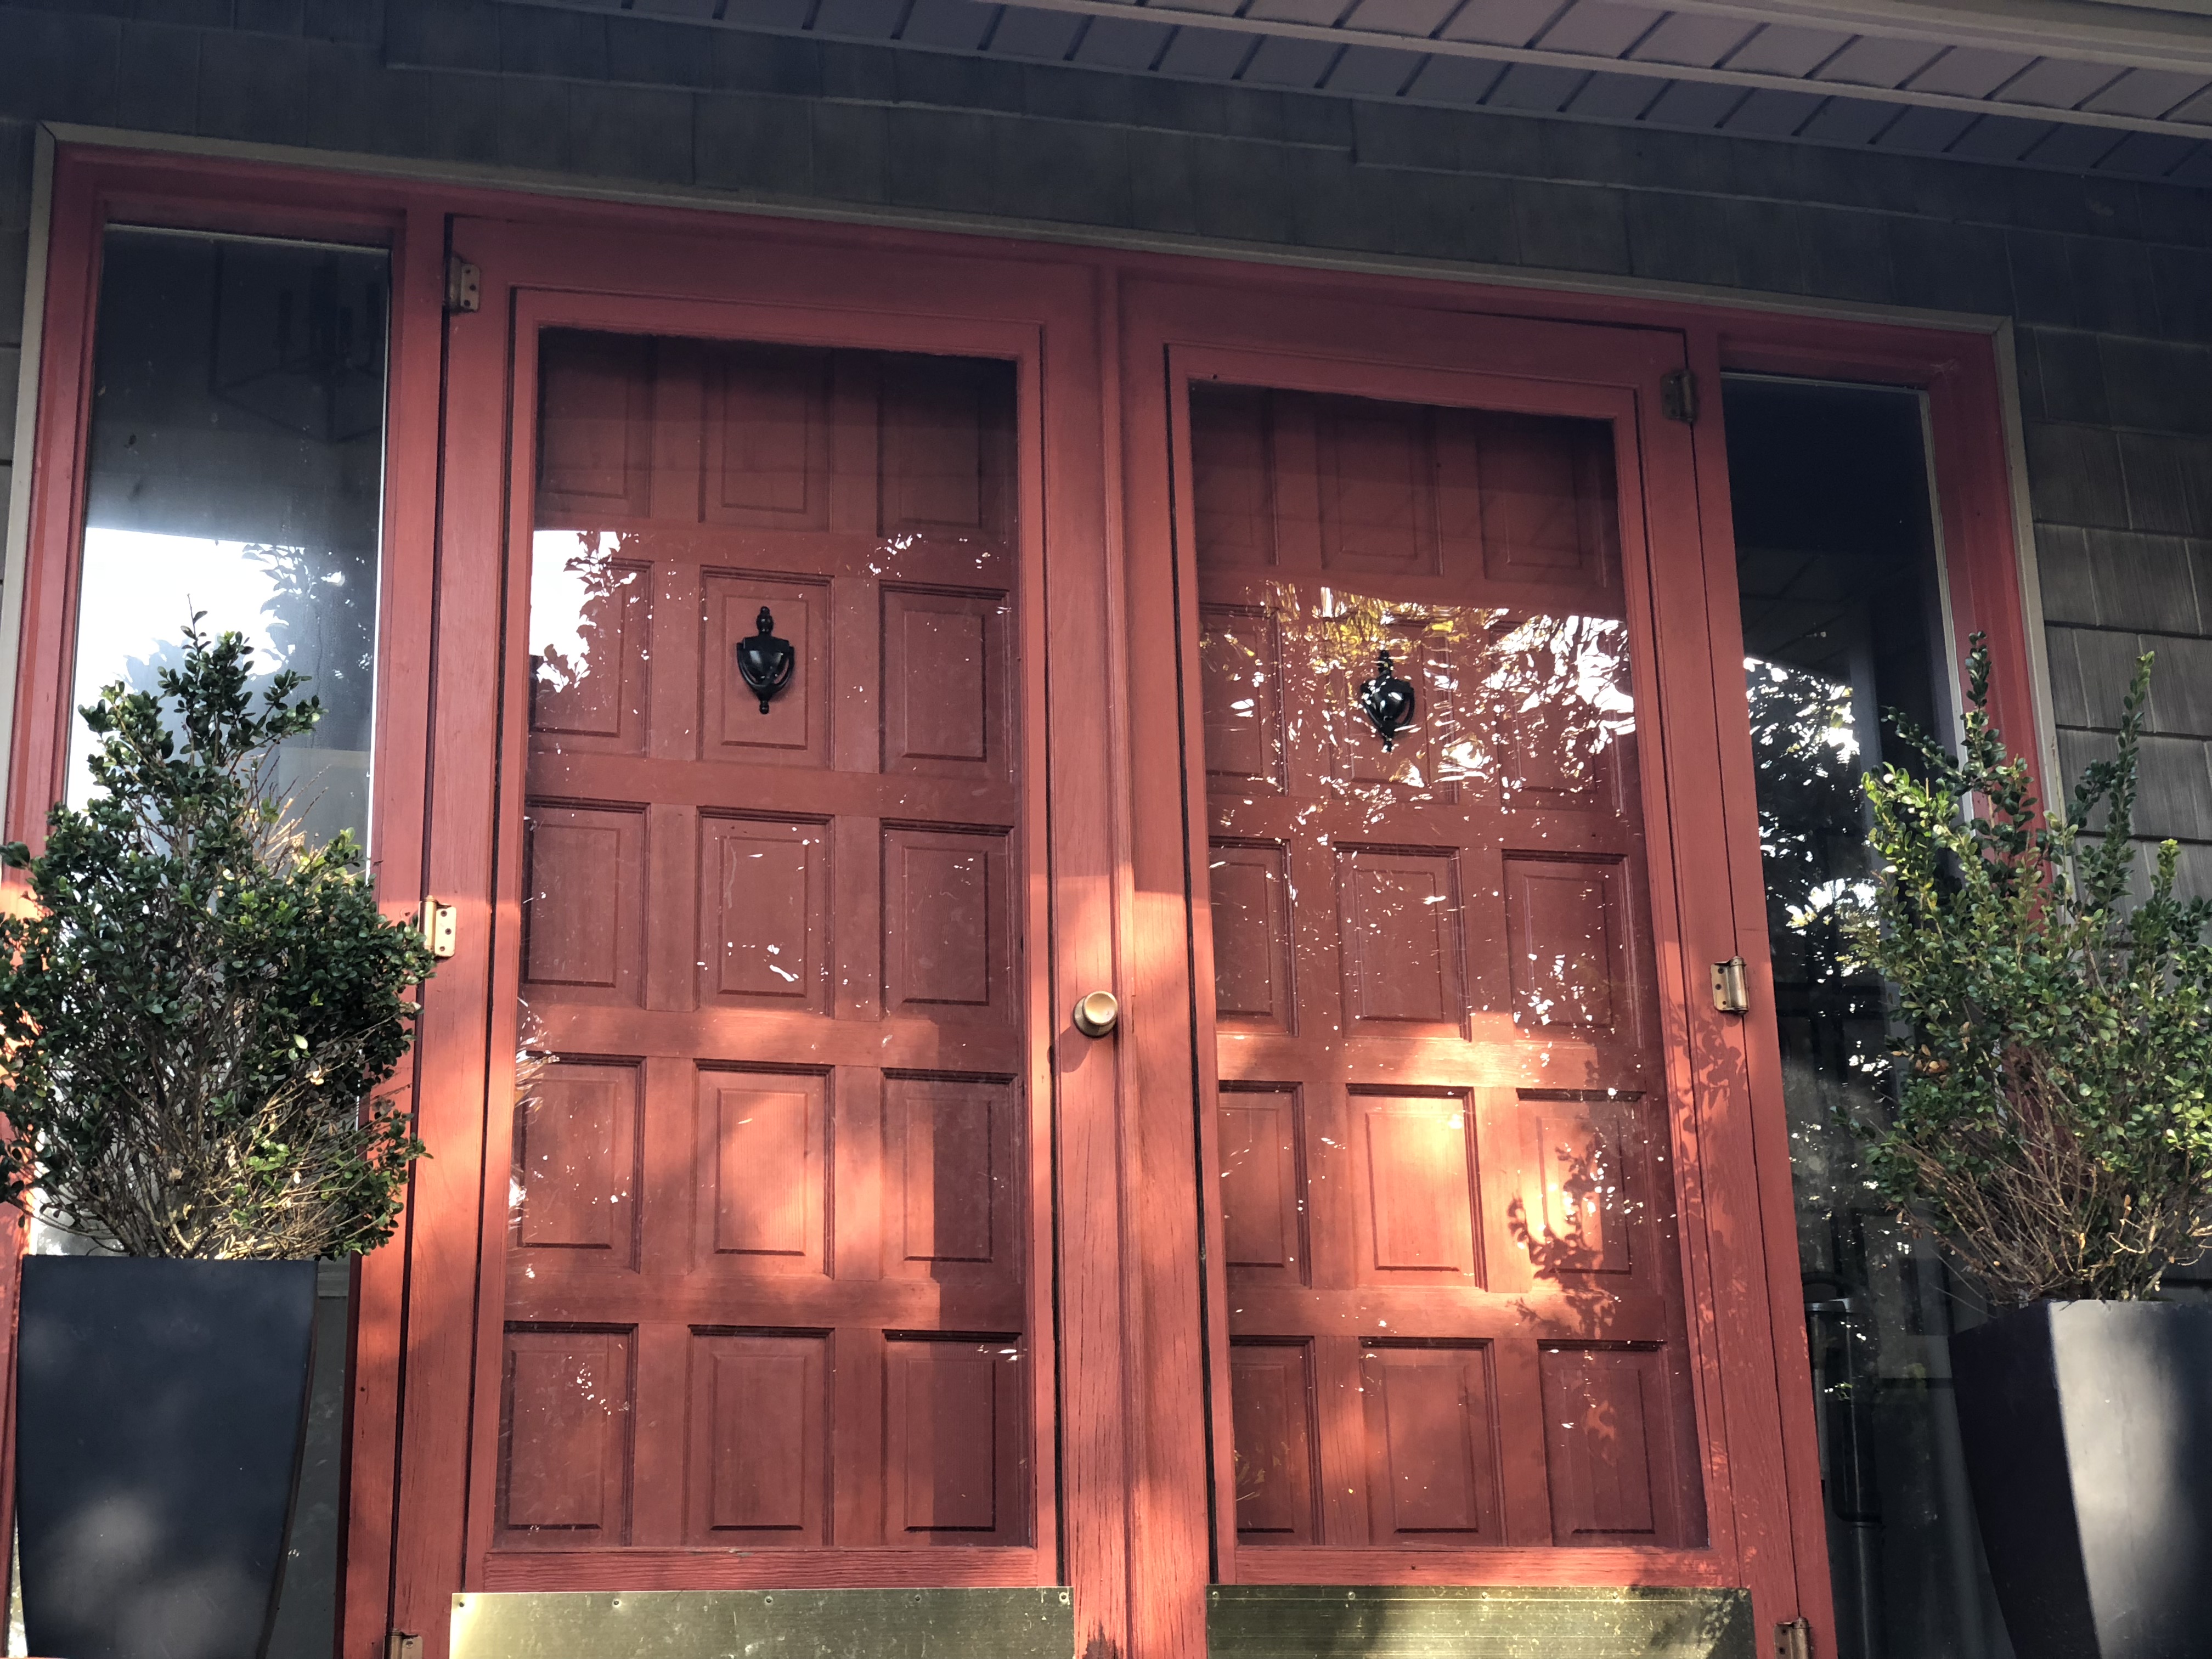
While the doors were indeed wooden, the natural wood finish had been painted over and the red paint was pretty faded after enduring 32 years of sun exposure (assuming these are the original doors belonging to my 1980’s fixer upper).
This fall, I received a quote to replace my front doors with wooden doors which also included glass windows in the design (something with more of a modern farmhouse vibe).
Much to my dismay, however, I was told it would be around $6000-$8000. These figures had me screaming hell to the no!!
Then one day, an answer came to me from the heavens(I mean Pinterest).
A tutorial from Rachael of Lovely Crafted Home gave me major hope, when she successfully gel stained her fiberglass front door to make it look like a legit, wood door.
And while I did have some evidence that this hack could serve my own needs, I was still a bit concerned that it may not have the same effect on an aged, not to mention painted, wooden door.
After a month of deliberation, I finally mustered the courage to give it a whirl -reasoning that if it did go wrong, I could always paint over the stain. Black doors would be my contingency plan.
Luckily, I didn’t have to resort to plan b , and I am super thrilled with the outcome of the gel stain.
For your shopping convenience, I have included affiliate links. As an Amazon Associate I earn from qualifying purchases

DIY Front Door Makeover Supplies:
- cleaning rag
- paint roller
- paint brush
- One quart of Glidden exterior flat paint color matched to Behr’s “Glazed Pecan”
- One quart of gel stain (I used this one)
- foam brushes or paint brushes (I used both) for gel stain application and wood sealer application
- One quart of wood protectant (I used this one)
How to Gel Stain over a Painted Exterior Door:

(Step 1): With a damp rag, clean front doors and allow to dry.
(Step 2): Remove door hardware and apply painter’s tape where needed (optional). We also decided to ditch the storm doors as they were in pretty poor shape.
(Step 3): Apply one coat of Glidden Exterior flat paint color matched to Behr “Glazed Pecan” . In case you are wondering why, this particular color will mimic the color of unfinished wood for proper undertones once the actual gel stain is applied.
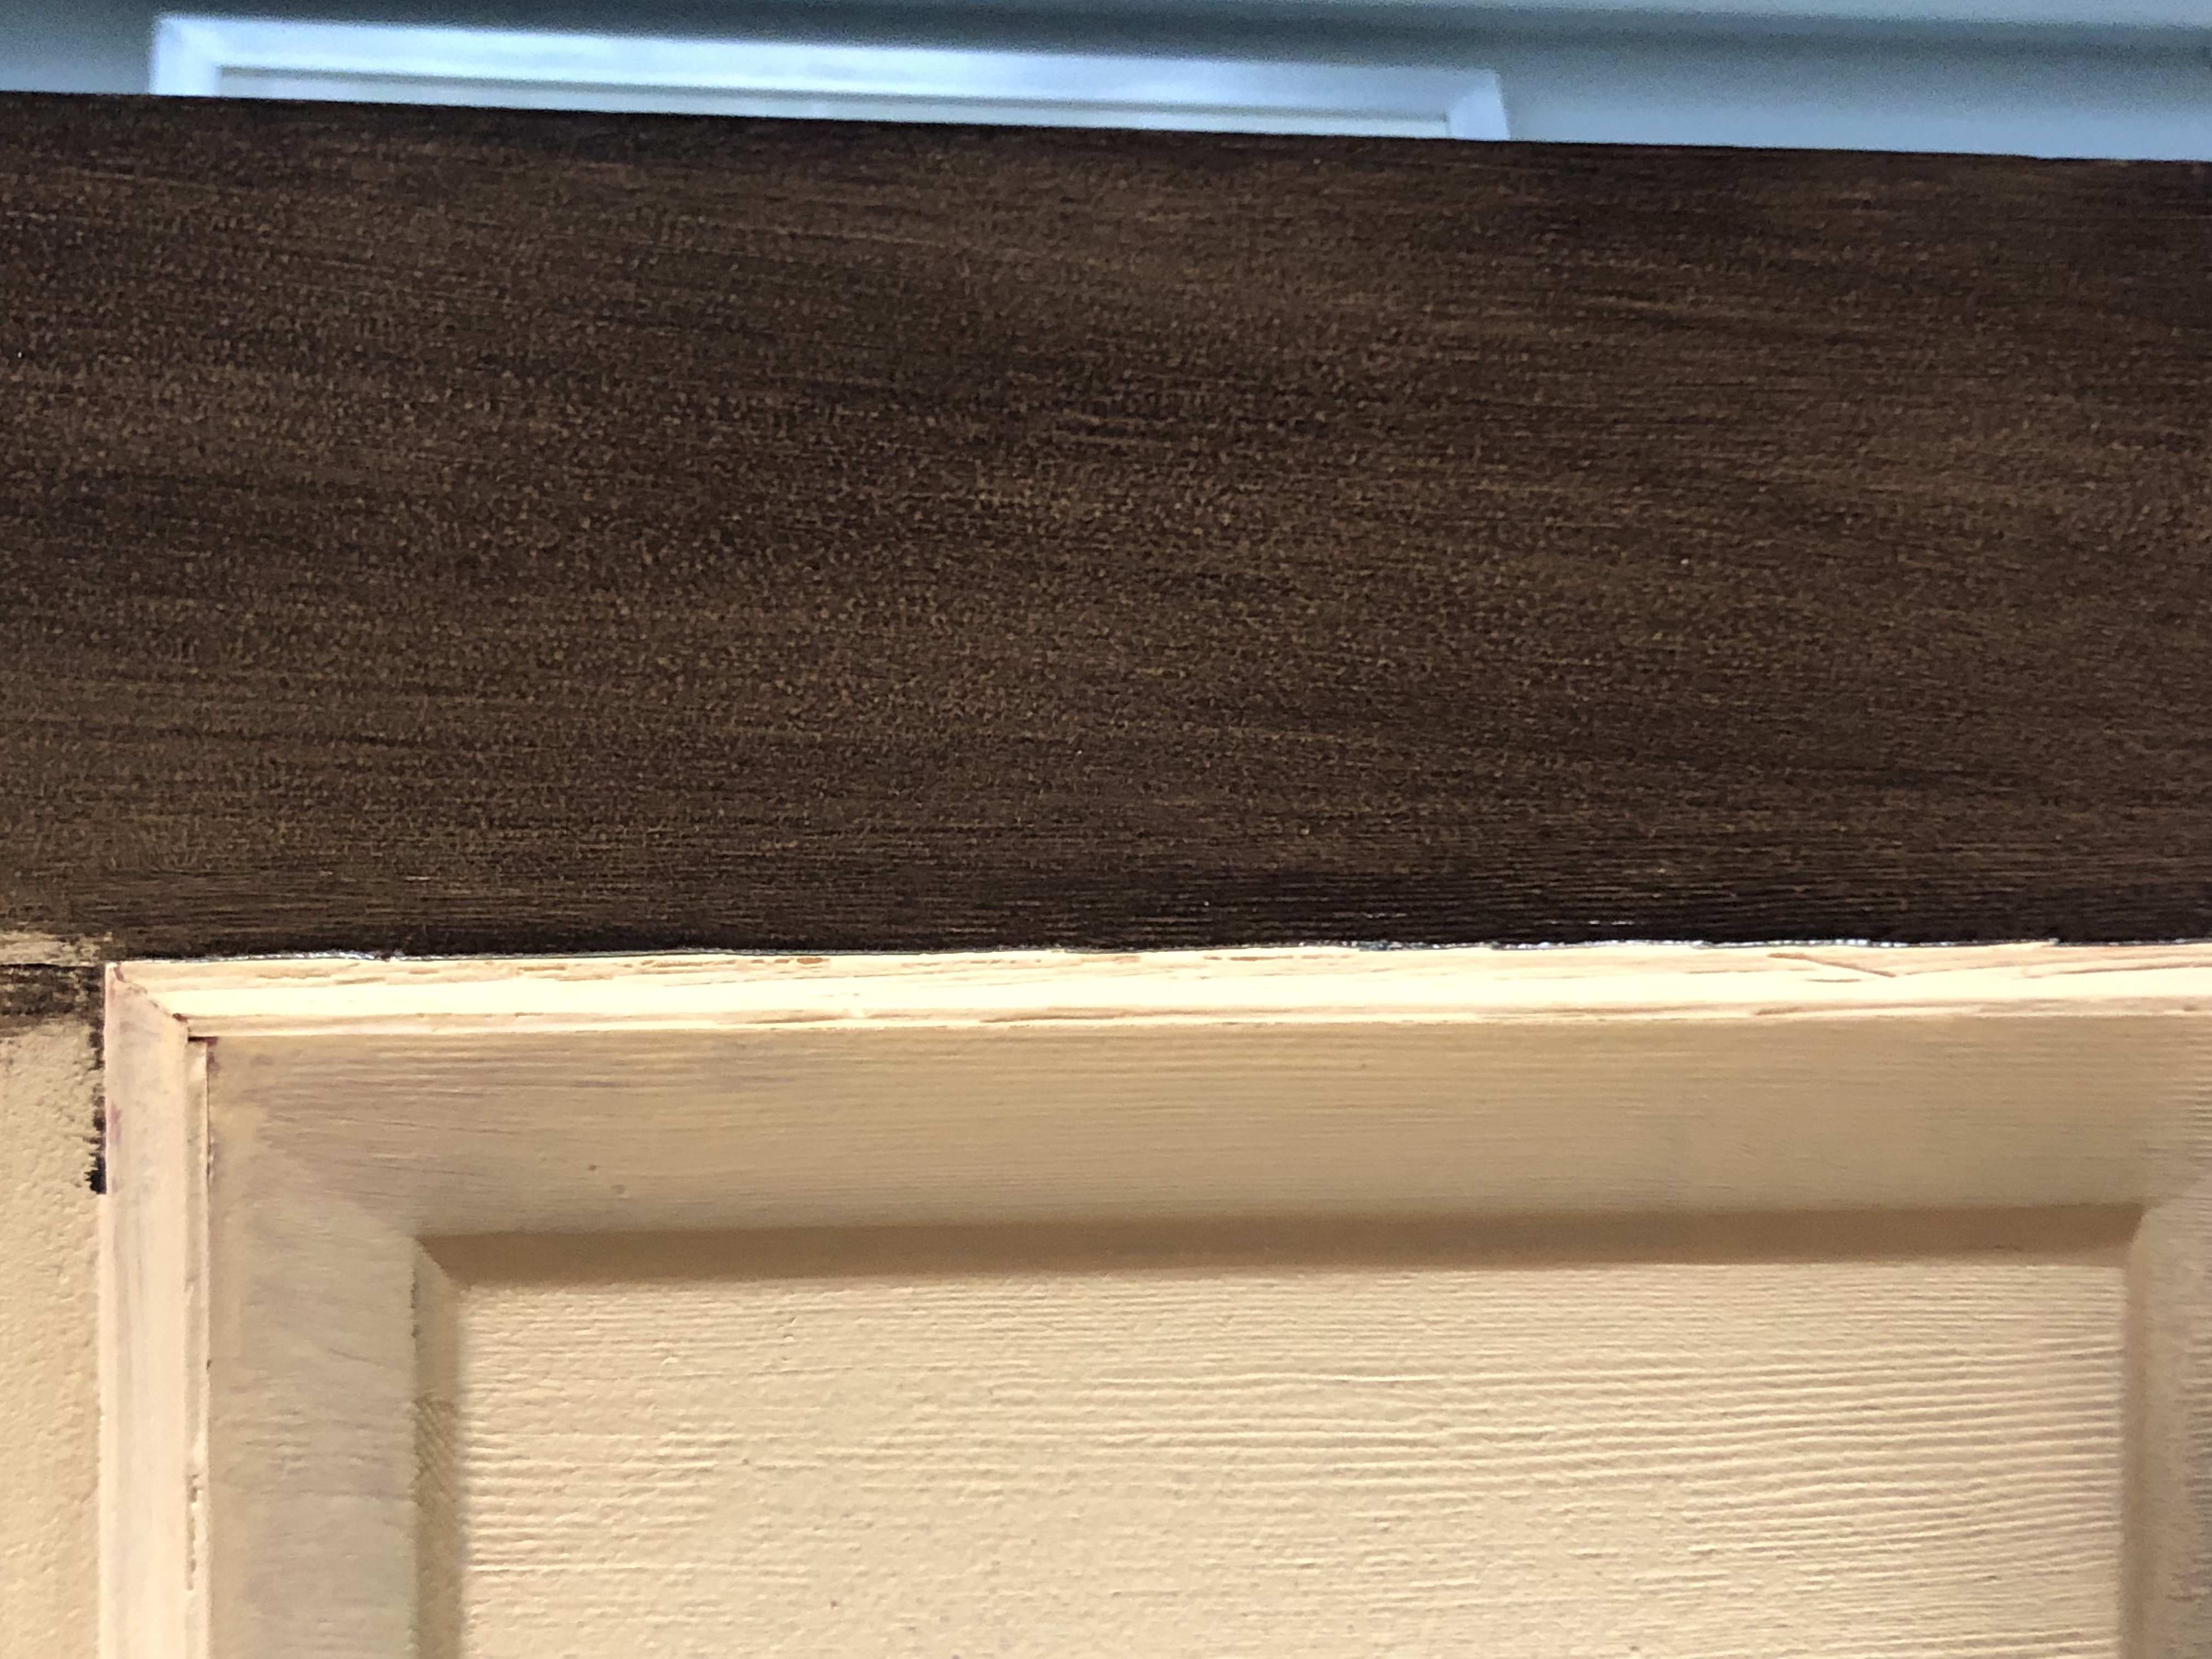
(Step 4). Once exterior flat paint has dried, you can now apply your first coat of gel stain. I went with Minwax’s Gel Stain in the color Walnut (you can find it here).
To apply the stain, I used a combination of foam brushes and standard paint brushes (it’s all about personal preference). The only thing that bugged me about the foam brushes is that they arent very durable. So, be sure to buy a multi pack of the foam brushes as I went thru several during this project.
When applying the first coat of gel stain, I addressed the flat surfaces first, and then worked on the detailed grooves.
While I prefer the lighter hue of the first coat, the results were way too streaky. So , I had to apply one more coat of stain to the doors.
Tip: Not sure if it was the humidity or the nature of the gel stain itself, but it took almost an entire day for the first coat of stain to dry. If you try to apply the second coat while the first coat is still wet, you are going to strip away at the first coat.
Learn from my mistakes… just be patient and allow the first coat to dry entirely before proceeding to the second coat.
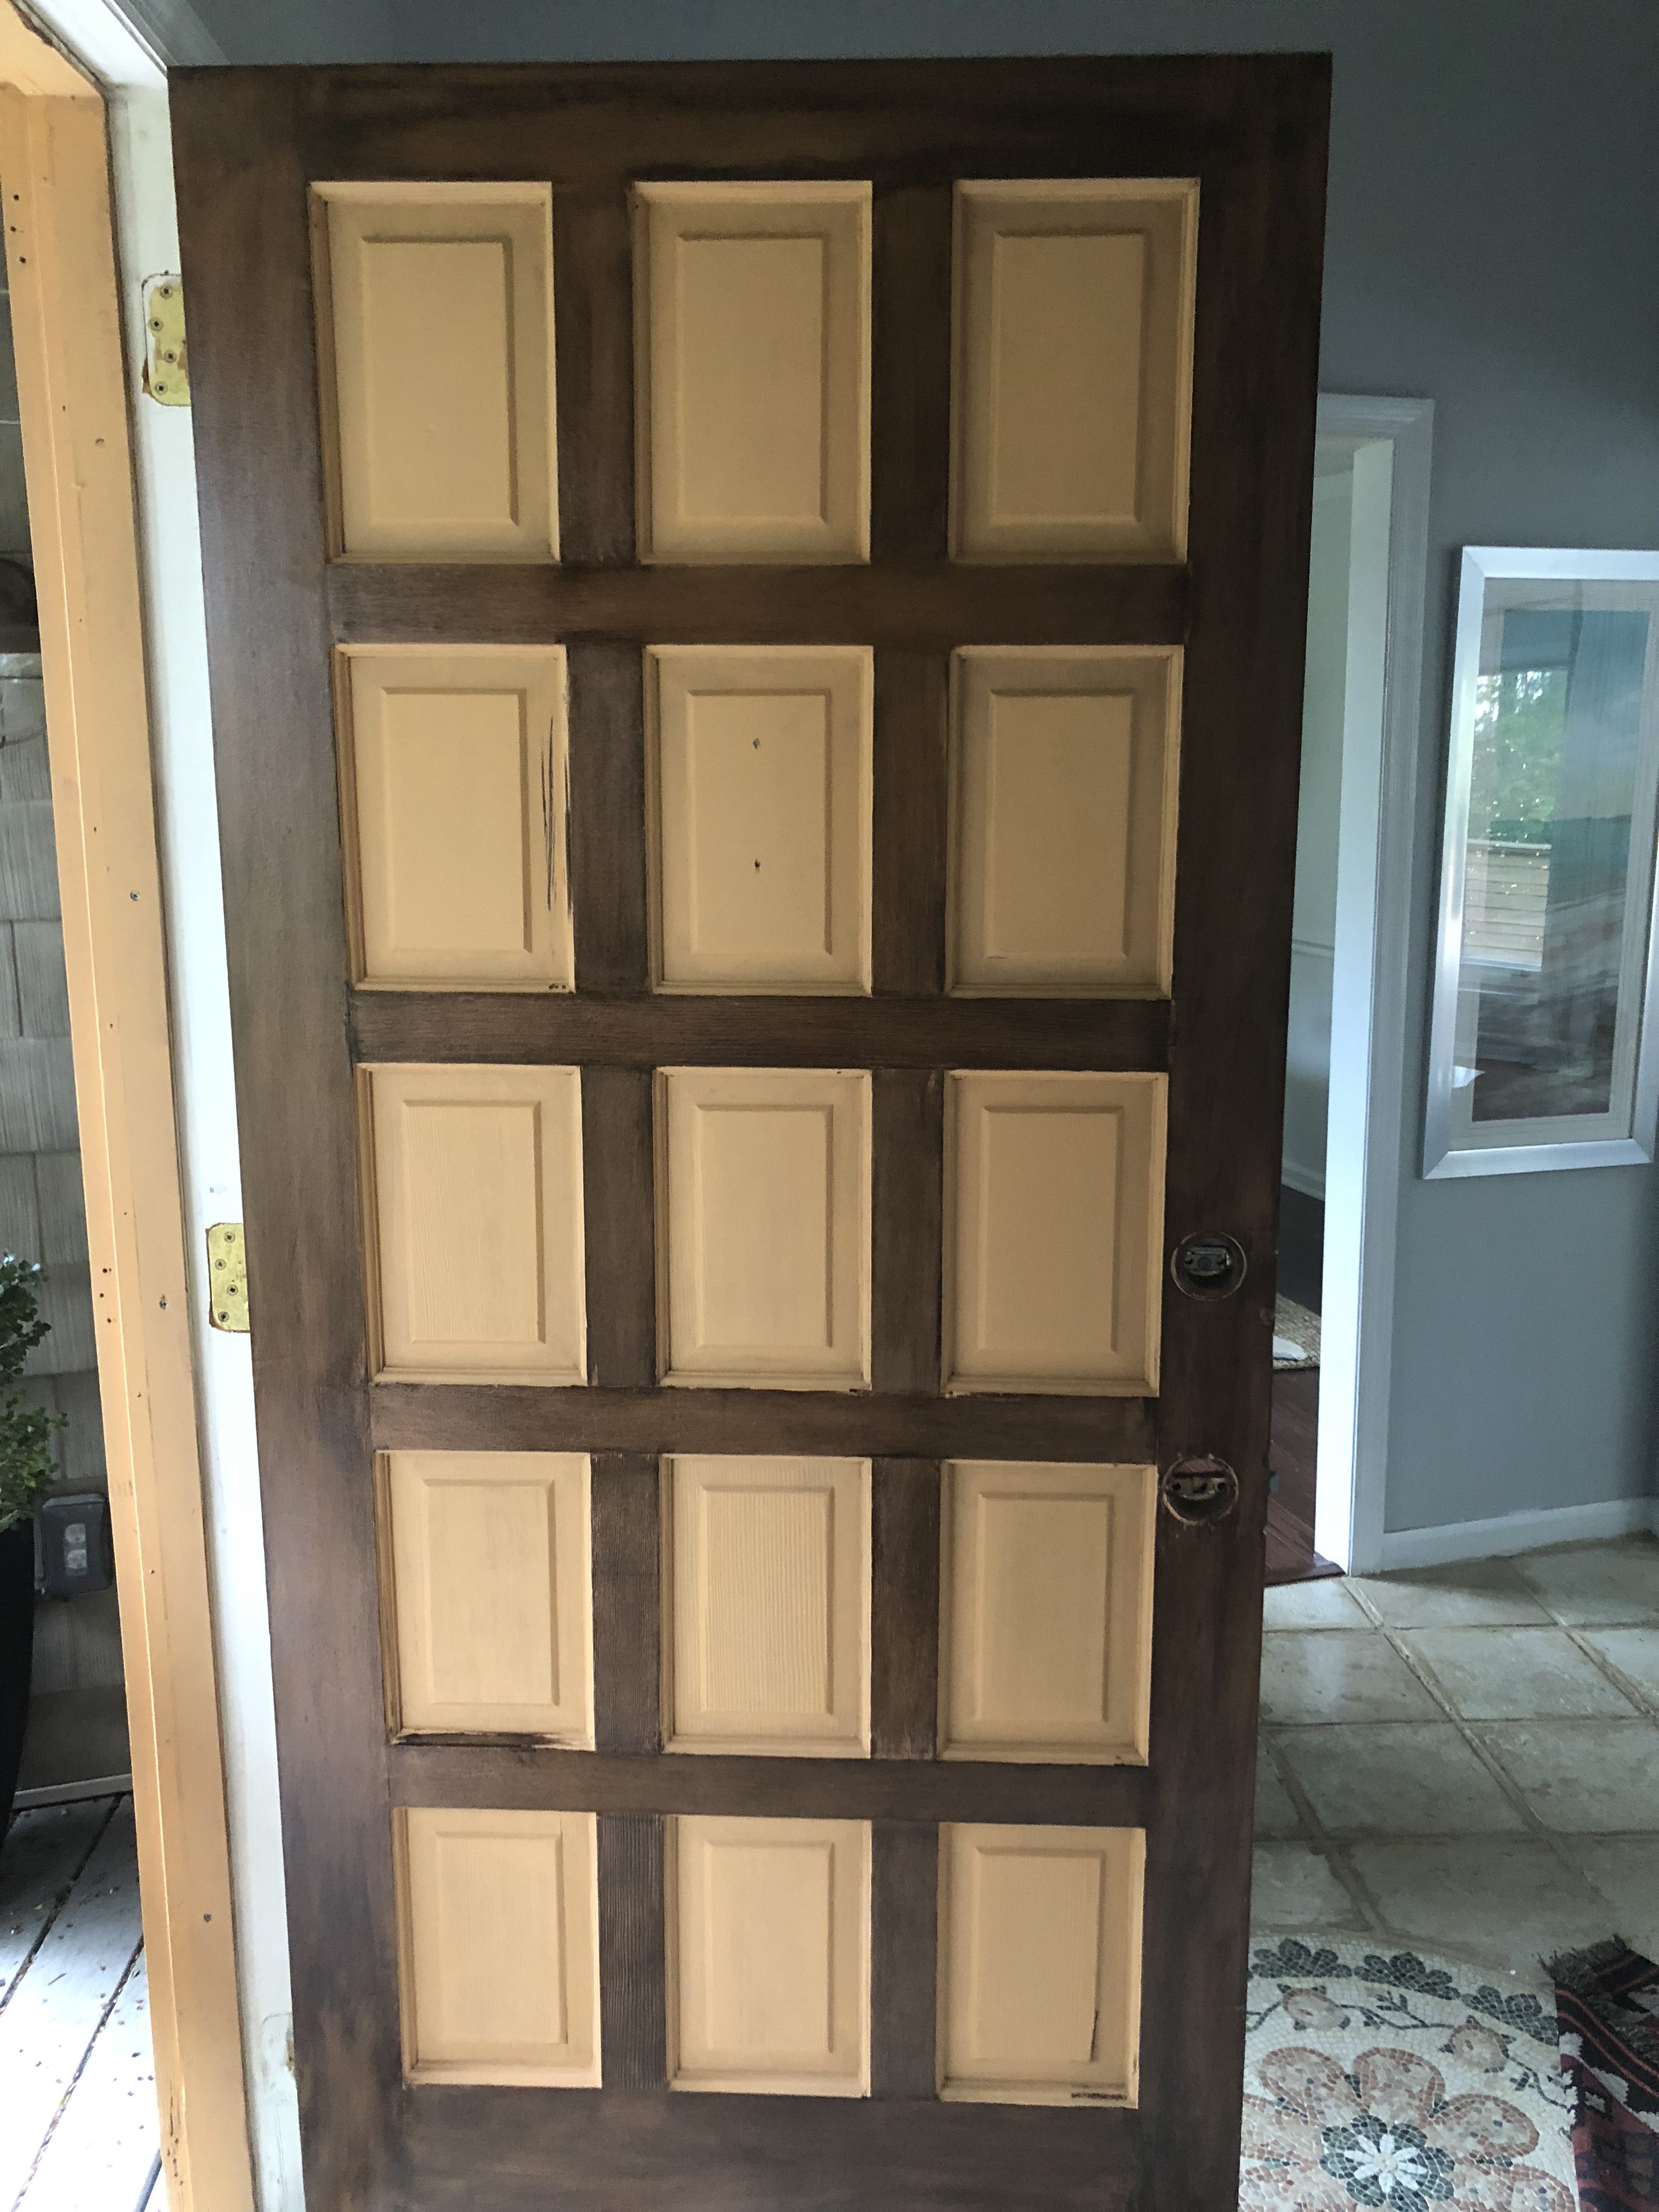
After one coat of gel stain….
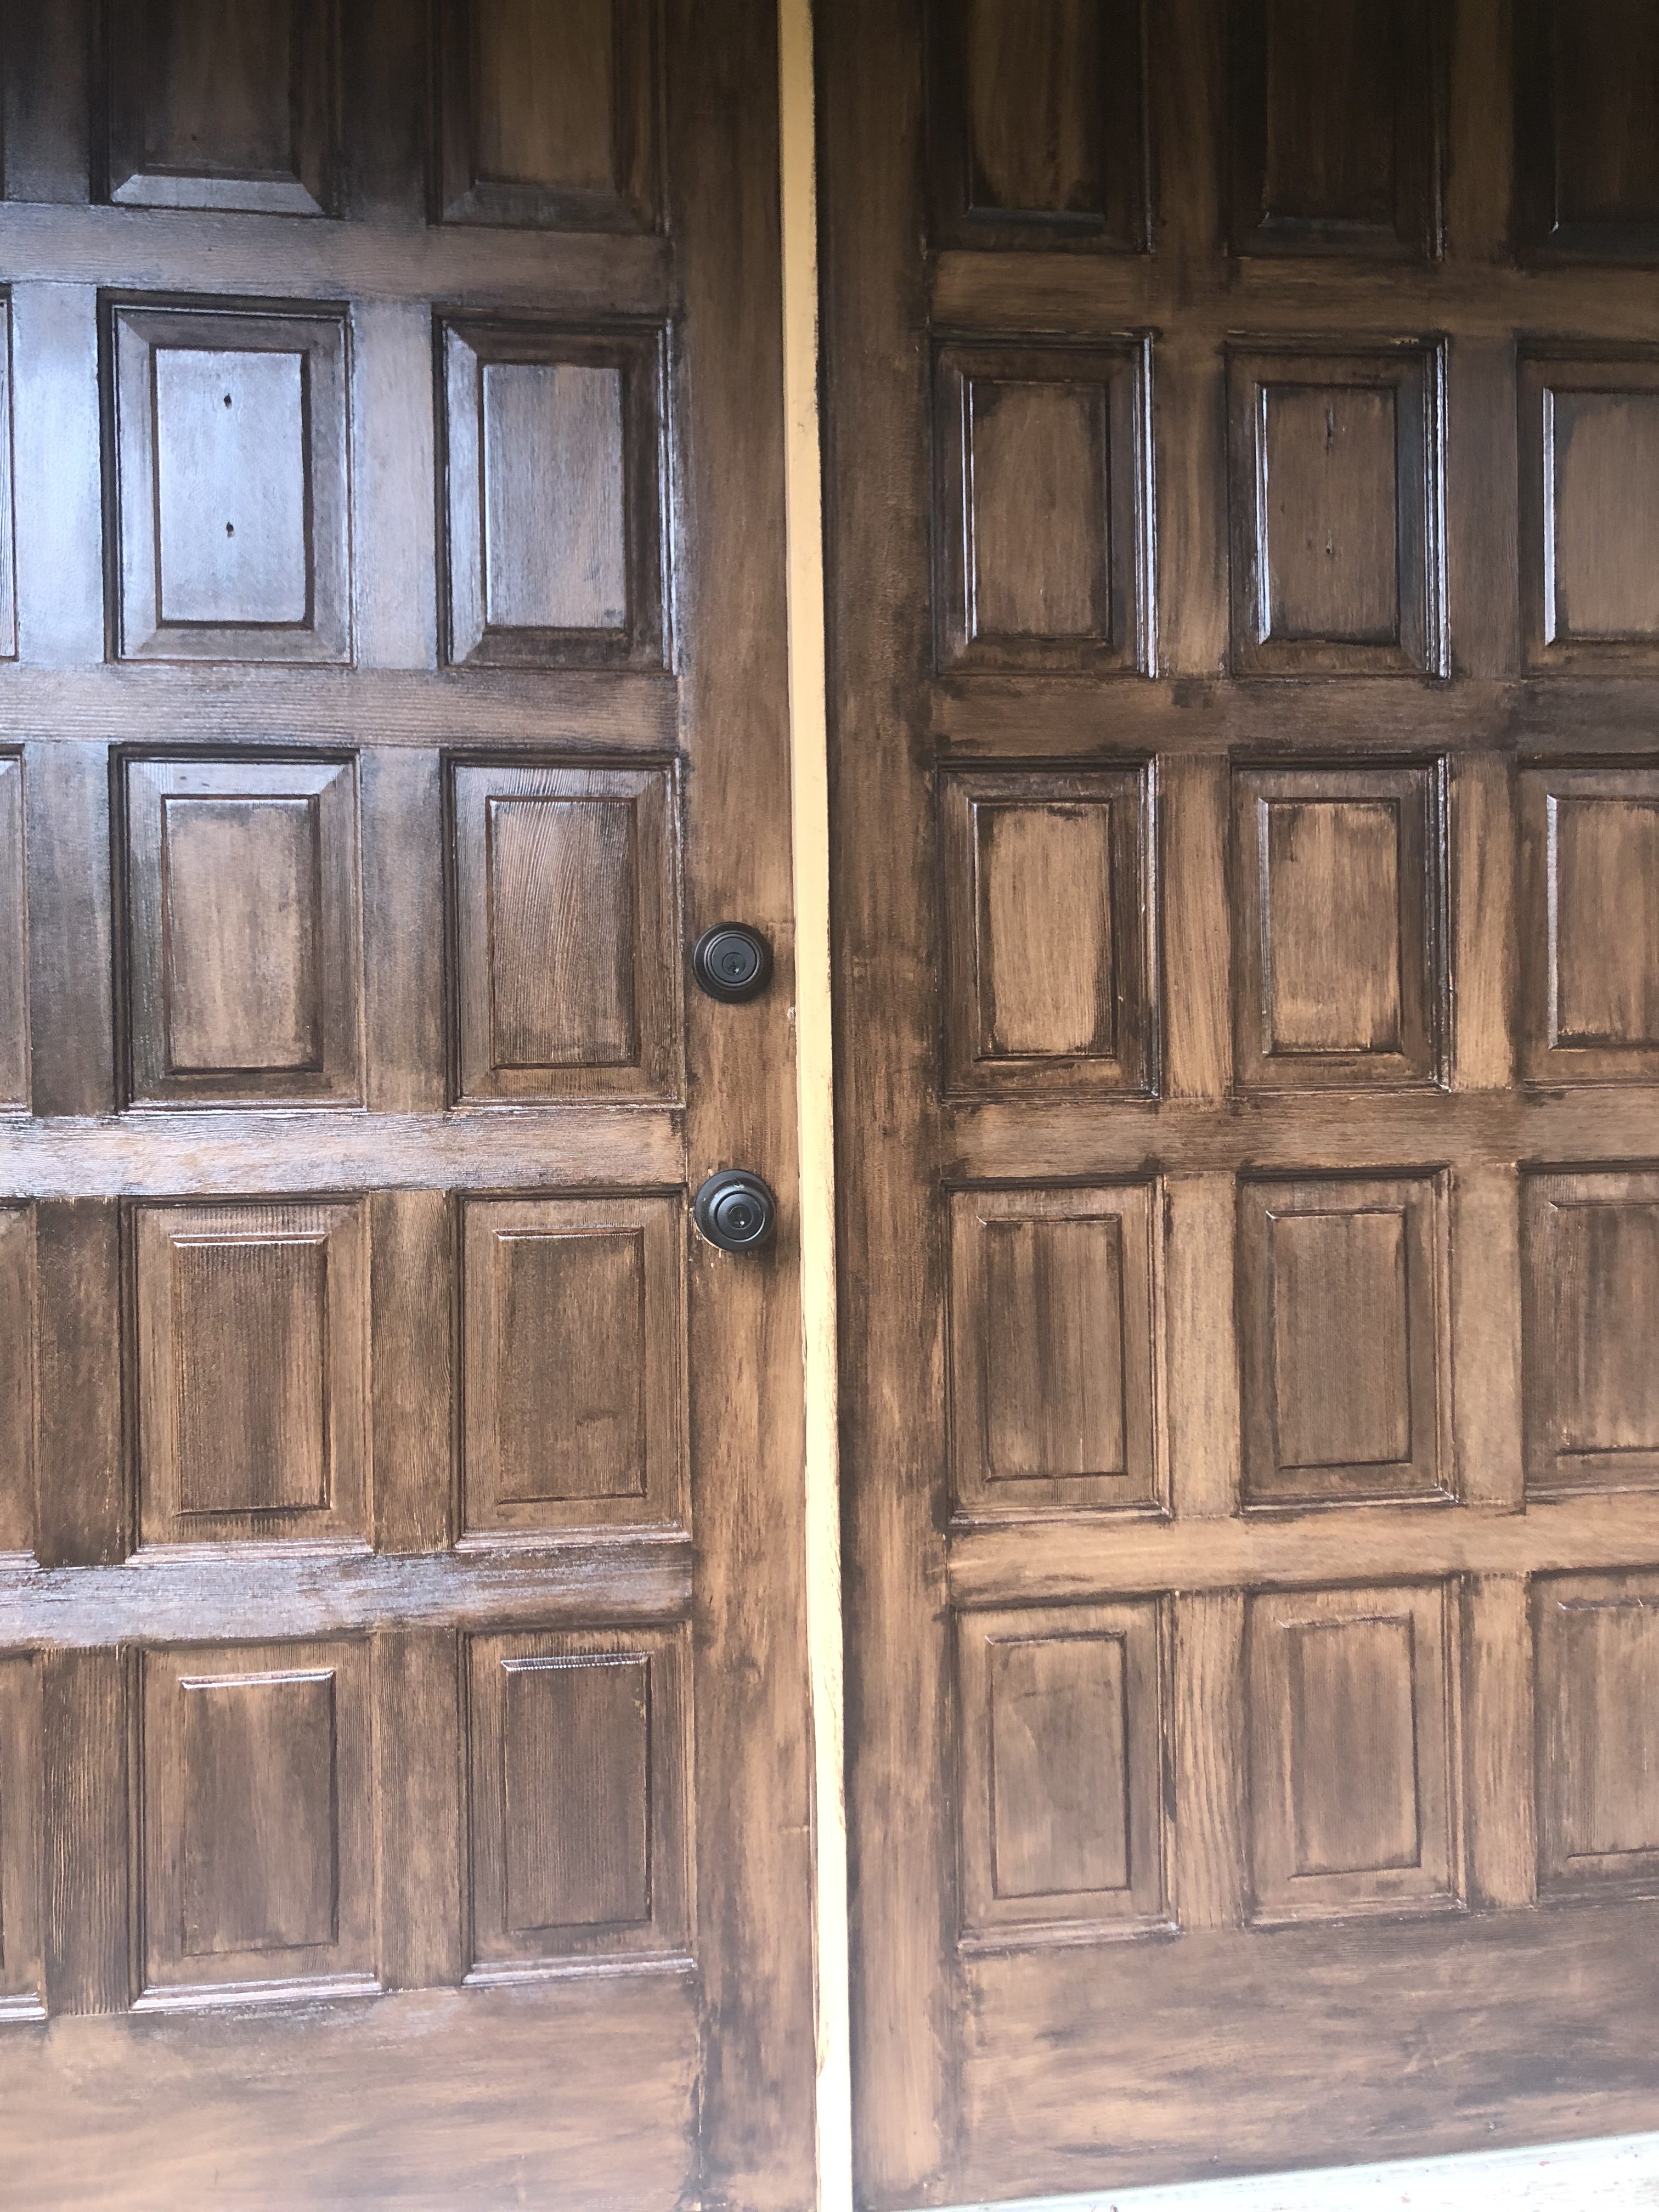
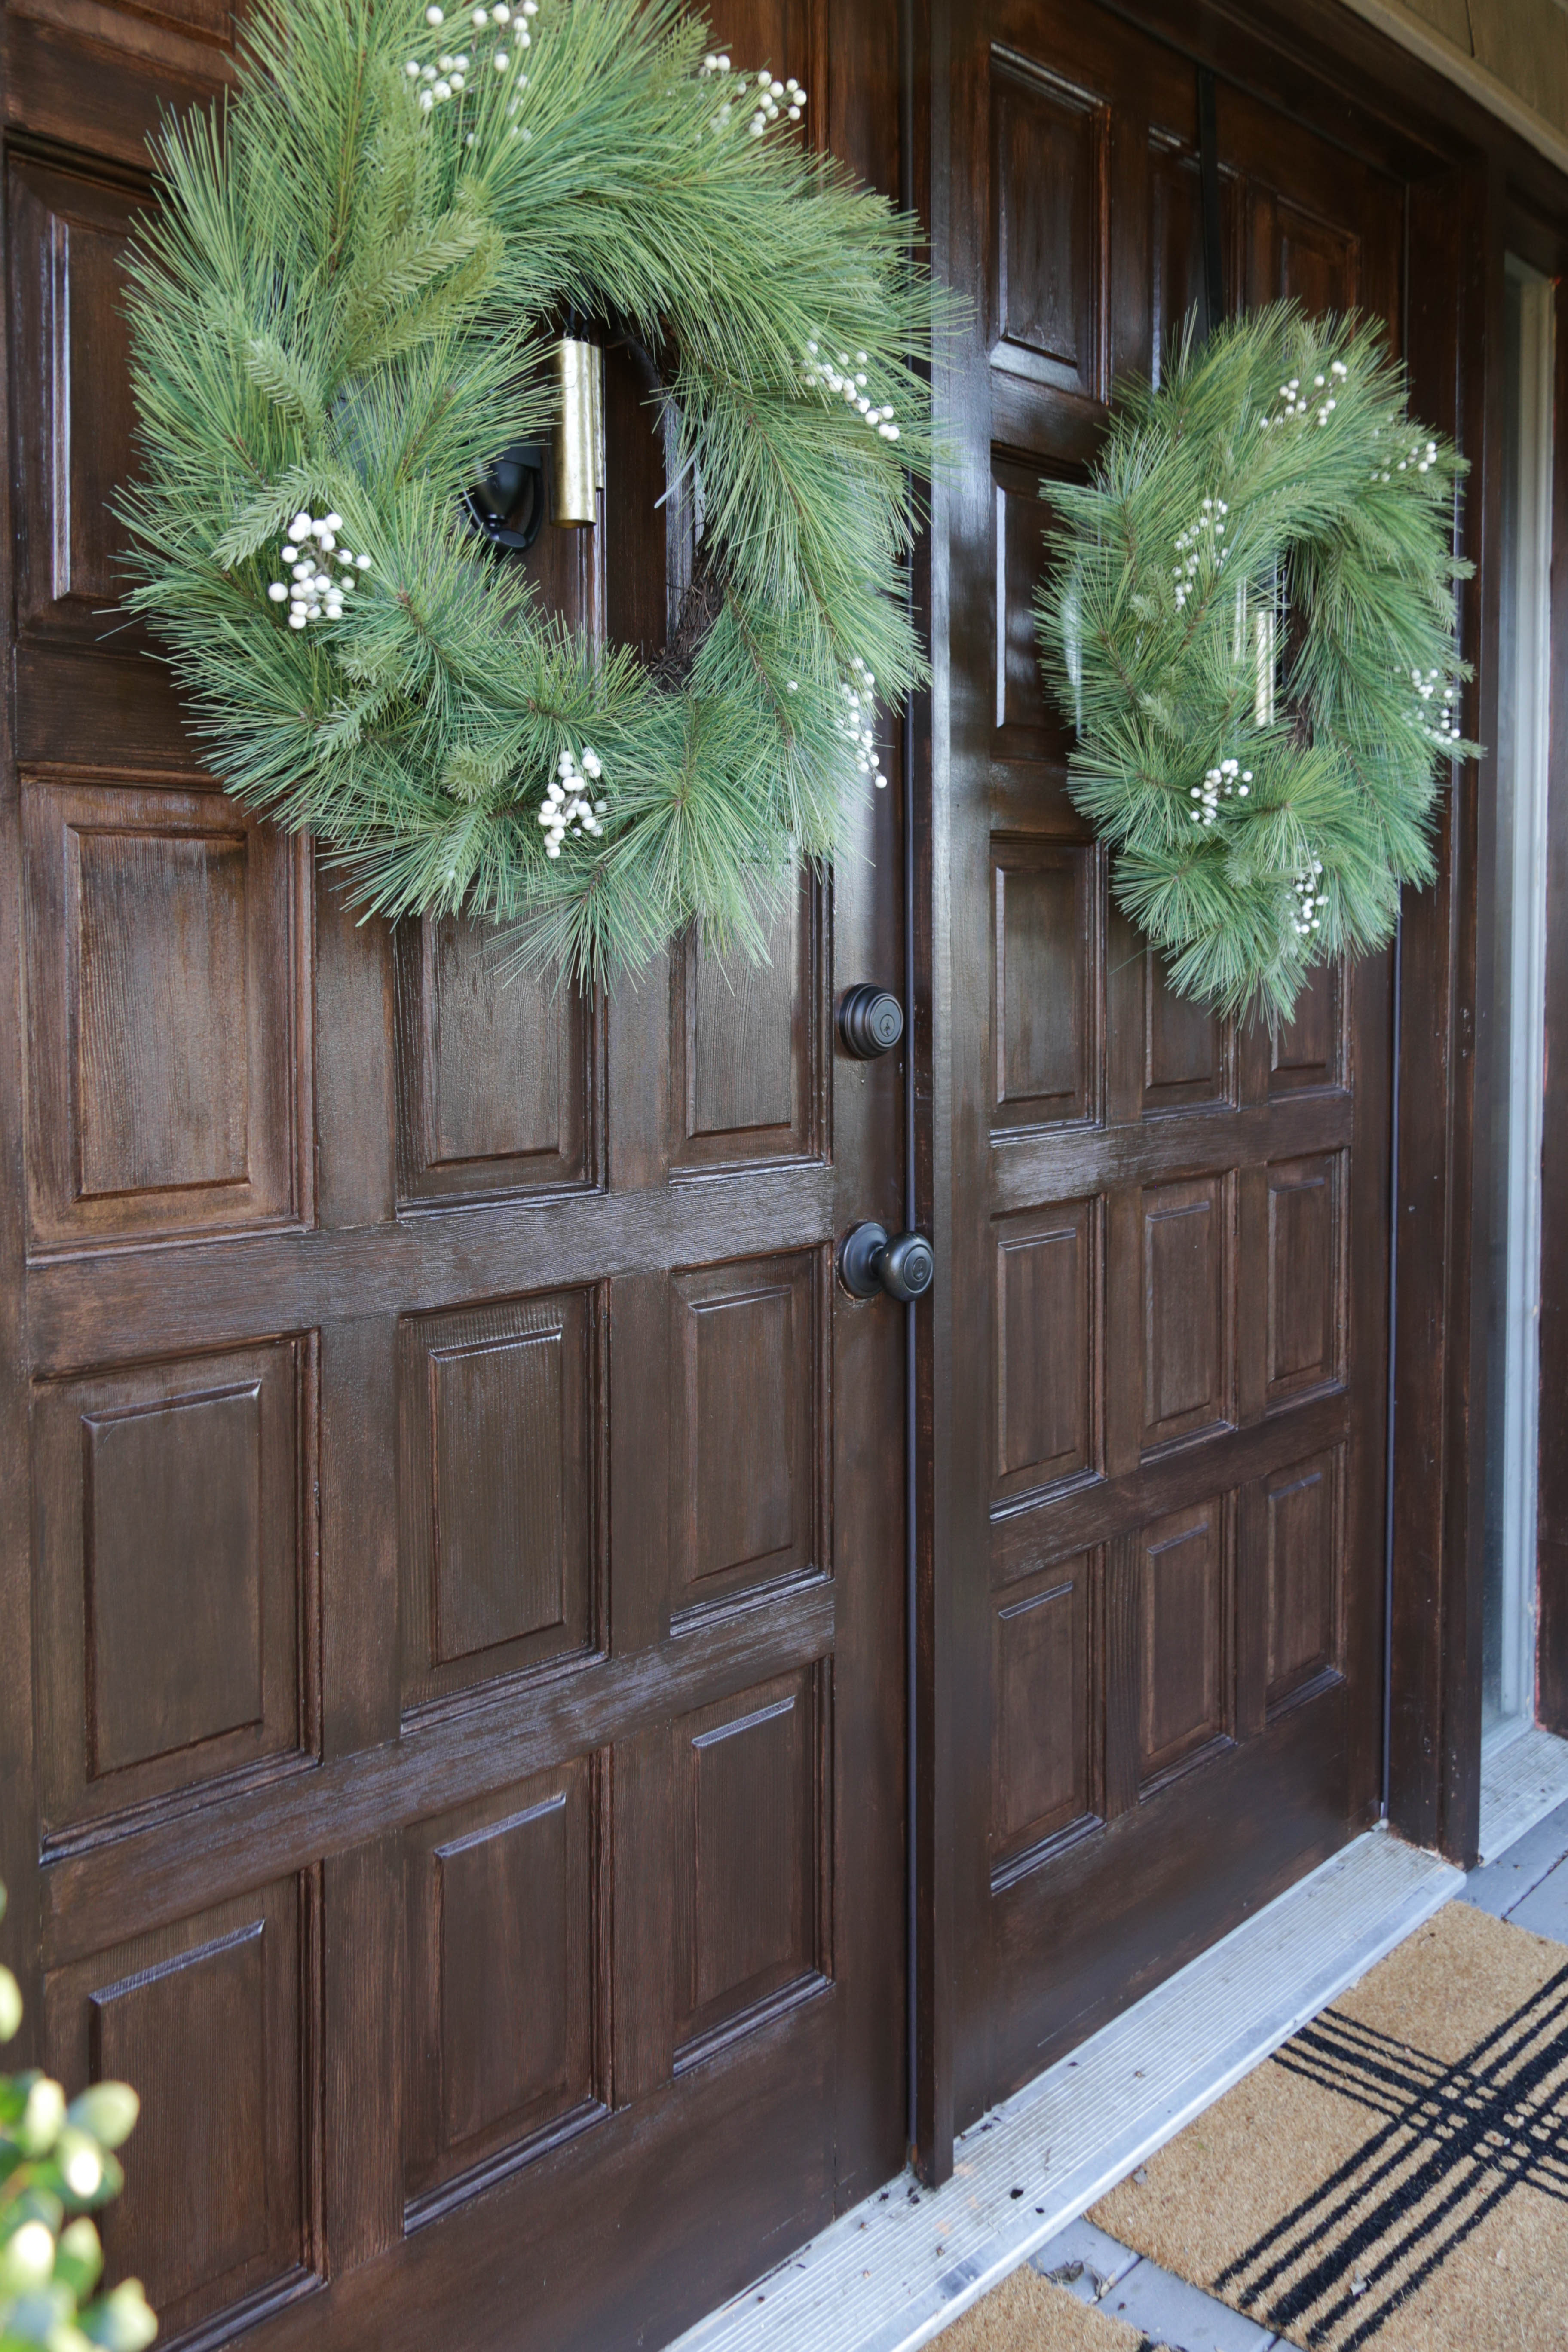
After two coats of gel stain and two coats of wood protectant….
(Step 5). After your gel stain has completely cured (we waited about a week), you will need to apply a wood protectant specifically designed to withstand sun and weather exposure.
Using a foam brush, I applied two coats of Helmsman’s Spar Urethane (you can get it here). Lucky for me, I already had a full quart of this in my garage from another project.
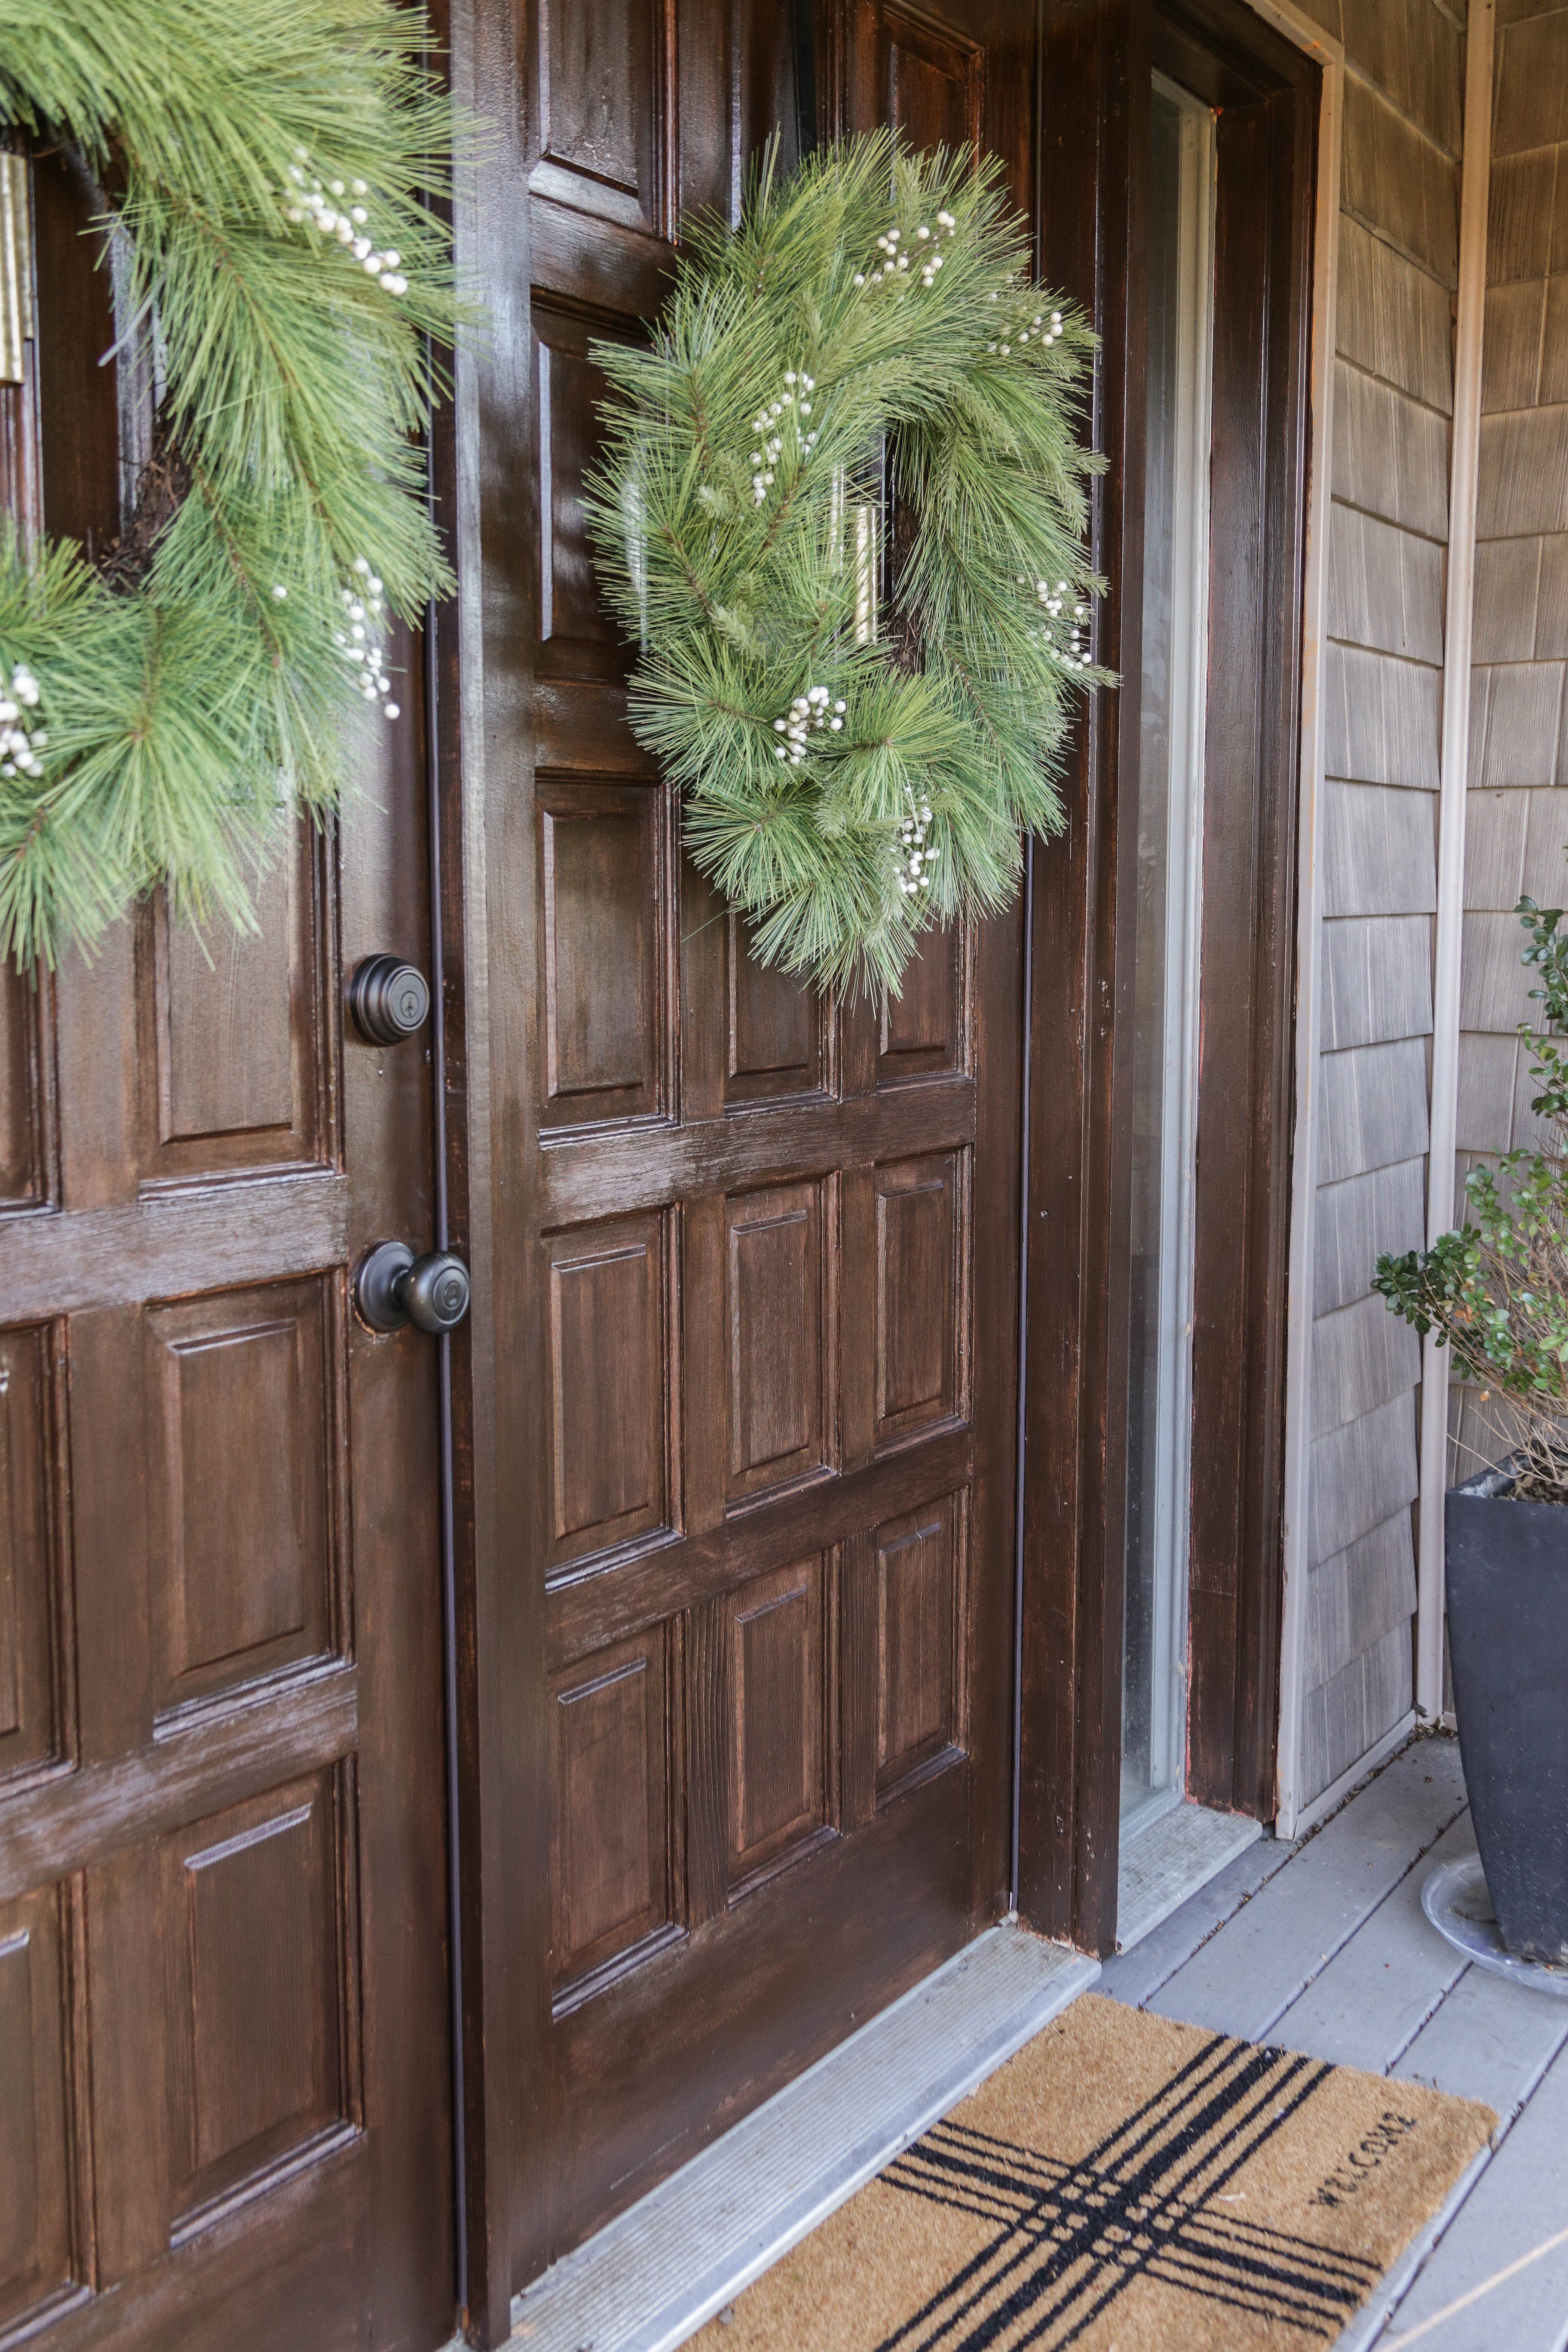
It has been almost two months since project completion and the doors are holding up beautifully.
And here is a little before/after action…
Using gel stain on my bathroom vanity in the past (you can read that tutorial here), I knew the product was very durable and super easy to work with. I just never realized you could also use it for outdoor/exterior applications. Thank you to Lovely Crafty Home for paving the way!
**Update 11-5-19: Curious to see how my doors are doing after one full year? Click here to read my follow-up review post. **
Wishing all of you a fabulous new year!
Now get out there and design some good vibes.
Please also be sure to show your support by “Pinning”…
Update 5-29-19: It’s been half a year, and I am still loving my gel stained doors. Here’s is a a recent photo of them to show you how well they are holding up…


Welcome!
My journey in interior design and home improvement began with transforming my first fixer-upper home, all while managing a budget and raising two young boys. My work, a reflection of my passion for creating beautiful, uplifting spaces, has been recognized by top publications like Better Homes and Gardens Magazine, HGTV, and more. I invite you to explore my site and witness the transformation of my home and the vibes we've designed. Read more...


Erica, That looks fantastic!!! You did a great job! I once used a wood-colored stain spray paint for a round bedroom mirror and it turned out really well, too. So fun!!
Thank you so much, Nancy! I didn’t realize there was a spray paint….I have a few projects where that could really come in handy. What a great idea!
They look amazing Erica and I love the new look! I’m glad you’re back and totally feel you on the holiday depression… I’ve been in a huge funk myself that I can’t seem to snap out of and just when I think things are about to get better I get something else thrown at me… The fact that you feel better is giving me hope 🙂
You are soooo not alone, my friend. I have struggled with depression on and off for years. What I have learned… rest (or even play) and a healthy dose of sunshine can do wonders. Sending you my love. This too shall pass.
Glad you’re “back”! The doors are spectacular!!?
Thank you so much, Michele. Wishing you an incredible new year!