
My DIY Painted Concrete Floors- One Year Review

One year ago, I painted the concrete floors of my screened-in porch with speciality paint from a big-box retailer. Now, after 12 months of use, I’m sharing an honest review of how they’ve held up (no one is paying me). If you’re considering a similar project, keep on reading to see what you can expect…
I don’t know about you, but I am so freakin’ ready for the warmer days of spring to be here. And while it can feel like winter will never end, caught in the thick of it, springtime will be here before you know it!

Once this realization came to me this weekend, I began contemplating the home improvement projects I would like to tackle before summer gets here. That’s when I realized—it’s already been a full year (okay, technically 11 months) since I painted the dated concrete floors of my back porch.
Because spring is the perfect time to tackle a project like this, I wanted to go ahead and share an honest glimpse of how this project is holding up (plus.. in the original tutorial , I promised to give a follow-up, so I am finally standing by my word).

The photo above is what the concrete floors on my screened-in-porch looked like when I moved into my 1970’s cottage. While I am not exactly sure what type of painting technique this is (up close it looks like sponge paint), I knew it sure as hell didn’t match my minimal-modern aesthetic.
After finding an inspiration photo of a budget-friendly porch makeover on Pinterest (which included the type of paint used and the actual color name) I decided to follow suit. Ultimately, I went with Behr’s Textured Low-Lustre Enamel Interior/Exterior Porch and Patio Anti-Slip Floor Paint in the color “Fresh Cement” not necessarily because I had heard it was an awesome product, but because another blogger had used it and I was hoping my project would turn out just as well.

Reading the product reviews, there was really no way to know how well this paint would hold up as it had about an equal blend of positive and negative feedback. As a result, I was a bit nervous to see how durable it would actually prove itself to be.
Following the manufacturer’s instructions, because the surface had been previously painted and was not peeling, we were able to forgo etching or priming the surface. We simply mopped the floors, allowed them to dry and then applied the paint (our porch project required 4 gallons of paint).
**You can read the step-by-step tutorial here. **
As far as the actual application, I was super impressed with how easy the paint was to work with. It also provided great coverage and dried relatively fast. The photo above was taken while we were waiting on the floors to dry and cure. Tip: Just to be safe, allow the floors to cure a little longer than what the manufacturer says…especially if you live in a humid environment.
So while this product was easy to work with and I was pretty pleased with the initial results, I am sure you want to know what the floors look like now. Well here you go…
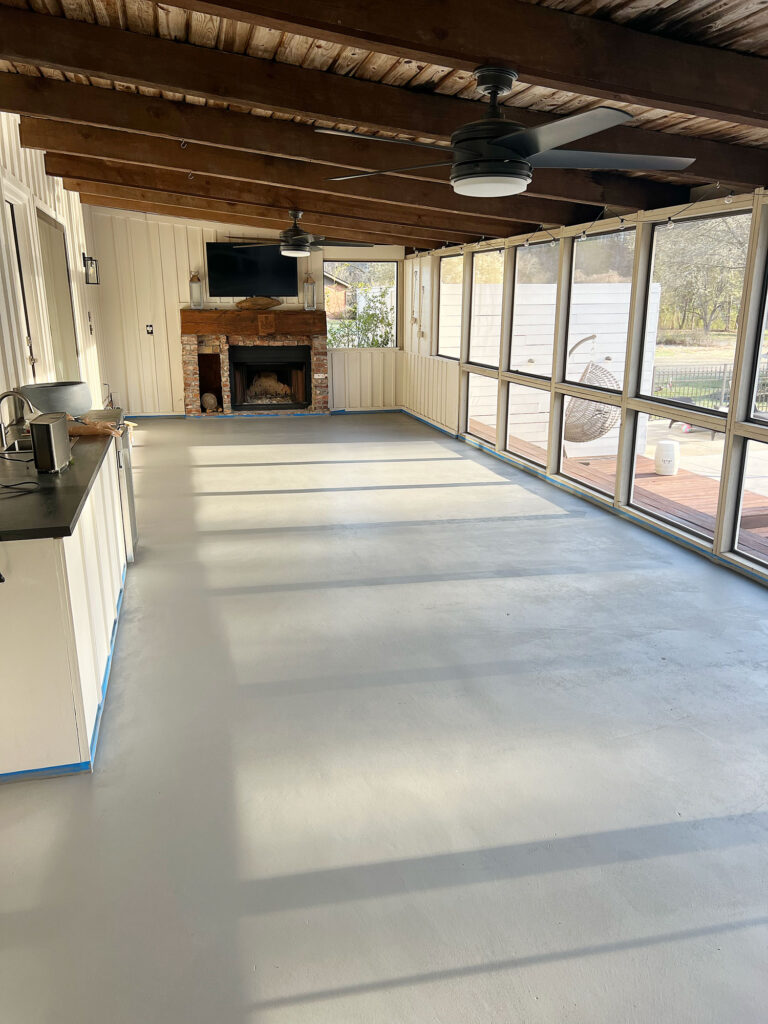
My Painted Concrete Floors One Year Later:

While, overall, my husband and I are actually pretty impressed with how the floors have held up given the low investment of the project (the total project costed less than $200) and our half-a$$ed prep (no pressure- washing/priming/sealing), there are some problem spots we have encountered.
The photo above is where the paint peeled off about a week or so after we finished painting. This spot was right next to my hot tub, and I am wondering if I got the area wet too soon. That or perhaps this was an area where we didn’t adequately remove dirt/grime before applying the paint.

Photographed directly above is the worst area on our porch by far. It is where people are constantly sliding bar stools out from under the table (and I have yet to put felt pads under the legs).
That being said, I don’t see it as too much of a biggie as I will most likely just touch this area up when the weather gets a little warmer and call it a day. I mean…I shouldn’t have let the situation get this bad. As soon as I noticed the bar stools were damaging the paint, I should have bought some felt pads.

Other than those two trouble spots, I am still relatively pleased with how this $200 project completely transformed our porch. My only regret is the finish I chose.
I went with the textured low-lustre and the rough texture along with no sheen , makes it super hard to clean with a mop alone (the texture straight up shreds the mop). Although it’s great for safety and avoiding slips, next time I would probably forgo the texture altogether. That being said, if you don’t mind pulling out the pressure washer every now and then (we simply didn’t want to risk water damage on our “outdoor” wet-bar cabinets as they that were not treated), I think the texture would be fine.

When it comes to concrete floors, I realize that there are so many factors at hand that will ultimately contribute to how successful (or unsuccessful) your unique project will turn out. If anything, I hope this review gave you a realistic idea of what to expect when DIY-ing this type of project (ya know…managing expectations).
**Updated 3-17-26: It’s now been a full two years since I painted these floors, and I’ve shared an updated review with everything that’s held up, what hasn’t, and what I’d do differently. You can read my 2-year painted concrete floors review here.
Thank you so much for stopping by and spending some time with me this week! If you found this post helpful, it would mean so much to this small business of mine if you could “Pin It” on Pinterest or share it with a friend…


Now get out there and design some good vibes along with a fabulous life!


Welcome!
My journey in interior design and home improvement began with transforming my first fixer-upper home, all while managing a budget and raising two young boys. My work, a reflection of my passion for creating beautiful, uplifting spaces, has been recognized by top publications like Better Homes and Gardens Magazine, HGTV, and more. I invite you to explore my site and witness the transformation of my home and the vibes we've designed. Read more...


Good to see someone else with painted concrete. I actually pulled up my carpet in a few rooms indoors (living and dining room) and the linoleum in the laundry and since I wasn’t ready for new flooring just yet, decided to paint the concrete. I used Sherwin Williams porch paint (no priming or etching) and a sealant. It came out pretty good. I am almost ready to replace the flooring but it’s been almost 2 years. It wasn’t terrible but like you, had some problem areas that I keep repainting and by now, I’ve just left alone. So, in a pinch I would do it again but it’s not for long term for sure. 🙂
Hey Lilly! Thank you so much for sharing your experience with this. When those areas started to peel, I was wondering if I should have put a top coat/sealant on or if I had not cleaned the area well enough. Sounds like this is just something to expect. And I would say that you used a higher end product as well (I almost went with Sherwin Williams too). Wishing you a wonderful rest of your week! xoxo
Hey there – this is helpful because we are going to paint over an old paved floor soon. Did you also coat with a sealer, after the paint? The products we are considering – one says to definitely use a sealer after two coats of paint (so three layers), and the other product says it’s a paint and sealer all in one – just two coats and you’re done. I’m skeptical of the second option, and leaning towards the paint and sealer separately to ensure a long-wearing finish.
Hi Marli! So I was lazy and impatient and did NOT apply a sealer. Looking back, I wish I would have. I would recommend it for sure. 🙂